Sunday, 16 March 2014

The Spring Knitting and Stitching Show - March 2014

Hello Ladies and Gents and how are you on this glorious March day! The sun is shining, the sky is blue... maybe spring is finally on its way :)

Last week, Husbandy and I were on vacation and we planned the days to make the most out of the March sunshine. On Friday we wanted to stay in London, so I decided to head to the Spring Knitting and Stitching Show in Olympia. It's an event held for the keen knitters and sewers over four days with numerous stands as well as free courses and other courses and workshops. I wanted to go last year as that is when my passion for sewing started, but sadly couldn't make it. However, all change for this year, so armed with my crochet hook, yarn and money I got on the bus and travelled to Olympia, West London.


On arrival I asked where to purchase a ticket. The man ushered me to the queue and I waited patiently with all the other excited people wondering what treats were in store. Before I got to the front this lovely lady gave me a complimentary ticket! This made my day and also meant I had more spending money inside! I thanked her numerous times and went on into the event.

The first thing I did was buy a programme so I could suss out where the knitting stands were. I know I'm into sewing but I'm currently undertaking a top secret crochet project so before I embark on sewing again, I thought I best stick to the current project in hand. With the stands identified I wondered around - glancing at the stands and
Goodies!
talking to the people running them. After a first walk through, I spotted the Quilters Guild - I chatted to them for a while and bought a raffle ticket as there was a stunning quilt as the first prize (sadly I didn't win). They were also letting people try machine quilting and the piece you made went to the Project Linus UK. I stitched some pieces together and now know my next project will be a quilt for my bed :)


After wondering around again, I went back to one stand called Woolie Batt that sold British made wool. I loved the fact this wool is sheared, woven and spun in Britain - a truly British made item from start to finish. I also loved the fact it showed the breed of sheep next to the yarn. It was a delight to see undyed yarn showing the wools natural beauty. I'm currently using Debbie Bliss blue faced leicester double knit for my top secret project and now pleased to be using Double Knit Organic Hampshire Down Wool too - delightful :)


British Wool!
After my purchase I went to a crochet group and made granny squares! It was pleasing to see people of all ages sitting together making granny squares. I also picked up a really handy guide on how to crochet - although I will need to teach myself the English abbreviations on how to crochet as I've been learning the American way! I couldn't resist the offer to sign up to the Simply Crochet magazine... I can't wait for the next issue to give me some great hints and tips!

All in all I had a great day just looking at all the yummy fabrics and delicious yarns. There was also displays of people's work - all very creative and inspirational. I'm glad I went and to all those novices I would recommend going to future events!

Happy Knitting and Stitching x

Sunday, 2 March 2014

Crochet - Mastering the Basics

Hello Ladies and Gents and how are you on this grey March day? I'm shocked that four weeks have passed since my last bloggie so I'll update you with my crochet news.

All through February I have been practicing how to hold the yarn and do the basic stitches. This may seem like a long time just to master the basics, but now I've ventured onto granny squares I feel it was time well spent.

Having a glimpse back at previous blog (First Crochet Blog) I think I got a bit cocky at my skills. I did learn how to chain, but achieving the right tension to chain consistently was slightly more challenging. So a top tip I will give to you all is to take time as a beginner to practice holding the yarn and needle - this is crucial as this determines the tension in the stitch itself. I tried different methods - some with greater or lesser success. At one point the yarn was so wrapped around my fingers it looked like I had a henna tattoo :). There are many great You Tube clips showing you differing techniques... I found this link particularly helpful 'How to Hold Yarn for Beginners' and I do a mixture of the first one and the final one - I wrap the yarn around my pinkie and then around my fore finger - this works well for me but everyone is different.

Another top tip is where to hang/ position your yarn. I tried it on the sofa, bed and floor (I promise I'm talking about crochet here!) and for me, sat on the sofa with the ball of yarn on the floor worked best. This is a great You Tube clip for other ideas: 'Crochet Body Positions, Holding Yarn and Chaining'

The best way to test how you hold your yarn and hook and where to place your yarn is to practice chaining. As I said above by simply chaining you will see if the chains are a consistent tension and if not, you can simply pull the yarn and start again! After successfully chaining, I moved how to single crochet and double crochet however I found this quite difficult when not following a pattern so I moved onto making granny squares! 

I'm so pleased I went back to basics before moving on. I feel by reading and watching tutorials it has helped me understand that tension of the yarn is important and will help with my future projects. Next time, I'll tell you about granny squares.

Top Tips:

  • Equipment: Yarn and hook
  • Take time as a beginner to practice holding the yarn and needle
  • Where to hang/ position your yarn - have a go with different styles - you'll notice the different :)
Useful websites:
Happy Crocheting xx

Sunday, 2 February 2014

As if learning to sew wasn't taxing enough... now crochet too!!

Hello Ladies and Gents,

As if learning to sew wasn't taxing enough, I decided I wanted to teach myself
'Roseanne'
crochet as well. I know I should concentrate on one before moving onto another, but after watching 'Roseanne' (with the lovely Dan Goodman) I just could not stop thinking about the afghan blanket (and Dan Goodman) that was hanging on the back of the sofa in the living room. With this idea fresh in my mind I purchased a fabulous pattern I could follow... but then thought 'I can't even crochet, let alone make a blanket'. 


Crochet Equipment
With my reigns now back on, I trawled the internet on how to get started in crochet. I found lots of good websites and tutorials on You Tube, but it was the lovely people of twitter who came to my aid on the tools I should use to get started. I was advised to buy a size 4 hook and 4-ply yarn. Armed with the basic knowledge of what I would need, I bought a Clover size 4 hook and some 4 ply acrylic yarn. Top Tip: I bought my first bits from eBay and it cost me less than £8 - a cheap lay out cost to test drive the new hobby in my opinion.

The hook and yarn arrived and following the tutorial on You Tube I wanted to follow (link below) I set out learning a few basic steps. The hardest bit was actually holding the yarn and making sure the tension was right. This did not come naturally, but after persevering I had learned how to do chaining. A chain in the crochet world is a when you have a slip knot already on the crochet hook and pull the yarn through to make a chain. After doing this for a good half an hour, I moved onto what is known as 'fourth from the hook' in patterns or 'double crochet'. This I found challenging, so will stop here as I need to go and practice the double crochet as apparently it is the most used stitch in crochet!

Happy Crocheting x

P.S. I need to make a storage case for crochet kit so will be doing a blog on that soon :)

Top Tips:
  • I bought my first bits from eBay and it cost me less than £8 - a cheap lay out cost to test drive the new hobby.

Useful Website:
  • Goodknitkisses. Beginner How to Crochet - Lesson 1. 
    • http://www.youtube.com/watch?v=mXmRm1ryXUQ
  • Crochet Hooks You 
    • http://www.crochethooksyou.com/
  • I Knit
    • http://www.iknit.org.uk/

Rhythm Riot 2013.... Can't wait til the next one - only 285 days to go!

Hello Ladies and Gents,


One Packed Mini!
With my tofino lounge trousers now ready, I had suitable lounge wear to go to Rhythm Riot!!! Those who don't know what Rhythm Riot is, its a 1950s Rhythm and Blues and Rock 'n' Roll weekend that takes place every year in November at Camber Sands, East Sussex. There's music, shopping, eating, drinking, dancing and more dancing that takes place in Pontin's... a perfect weekend to spend with good friends and make new ones. This was my first time to the Riot, but had been looking forward to it since we booked it in the summer 2013. 
Missy Malone 

The biggest challenge was what clothes and accessories (not to mention shoes) to take with us... so in the end I think we took everything but the guinea pig! (don't panic, I had someone to look after the furry old man!). With the Mini packed within in an inch of its life we set off from London to Camber with music playing and sun shining. 

As I'm a bit late in sharing - as this is now over two months ago since the Riot - I'll spare you all the details of the whole weekend, but it was everything I expected and more. The shopping was fantastic with a wide range of original and repro clothes from the 1930s, 1940s and 1950s. I picked up some hair flowers and the most gorgeous wicker handbag. The music was sensational... on the Saturday night we went to watch 'The Teenagers' and they just took my breath away... they had to be the best performance of the weekend. The cabaret in the Lady Luck Room had the delightful Missy Malone, Cherry Shakewell and Little Miss Bodacious to tantalise and tease you with their burlesque. 
The Teenagers
 All rooms played wonderful music and I really enjoyed watching people dance. Husbandy and I had a few dances too which was really good fun. Everyone looked glamorous and most importantly were enjoying themselves! 


All in all it was a perfect weekend... a great break with good friends... role on November - Rhythm Riot!!

Happy Dancing x

P.S. My tofino trousers were very comfy especially when nursing my gin-induced hangover :)

Sunday, 19 January 2014

Finishing Off and Catching Up... oh and Happy New Year!!

Happy New Year Ladies and Gents...

Firstly apologies for the lack of love I've been giving my blog... life has been getting in the way... so I'll do my best to update you with what projects I've been up to and other adventures along the way :)

My last blog was about cutting out the fabric and practicing button holes for the Tofino Lounge Trousers. Now with all the pieces cut out ready, I needed to tidy the edges of the fabric so they didn't fray. I've mentioned before I don't have an Overlocker so I use a zig-zag stitch to stop the edges from fraying. To do this, you put one part of the zig-zag stitch into the fabric and the other over the edge. A great blog which shows this is Tilly and the Buttons - Finishing Seams - Zig-Zag Stitch. Once I had gone around all the pieces of fabric, I pinned the fabric (right sides together) aligning the notches. Once pinned, I took the first leg to the sewing machine, sewing 1.5cm along the seam. I did this to both legs. With legs had been sewn now came the tricky part of sewing them together!

So with this in mind, I re-read the pattern. I inserted one leg inside the other (with one leg right side out and the other inside out), lined up the notches, pinned and sewed following the 1.5cm allowances and as per the pattern. Top Tip: Please make sure you follow the 1.5cm allowance... I think mine varied so when finished the trousers were a little snug. Once sewn together, I pulled the leg out and they actually looked they the beginnings of some trousers... smiles all round :)

The next steps was to make the waistband. As my fabric was light-weight I bought some interface to give the fabric more strength - specifically around the the button holes. I purchased some interface that would be ironed on. Top Tip: Practice ironing the interface on a bit of scrap fabric. This will ensure you iron the right side to the fabric and also check out much heat needs to be applied to make it a success. Once I had done a test run, I cut the interface to fit over the buttonholes and ironed accordingly. Once completed, I made the buttonholes (more information on buttonholes on my previous blog Preparing for Tofino Lounge Trousers) and followed the pattern on attaching the waistband to the legs. 

Waistbands and I don't seem to get along very well. It took me over an hour to understand what the pattern meant. What I worked out was that the waistband goes over legs and not just attached to the top. This is hard to explain, but from the pattern I thought it was pinned to the top - not that the waistband was actually attached up-side-down, wrong side out and over the legs - I hope I've explained it ok! Top Tip: When sewing the waistband don't forget to leave a big enough hole at the back to allow the tie belt and elastic through. Ok, so waistband and legs all attached and nearly finished - hurrah!

Here is when I had a change of heart and made the tie belt. I was lucky enough to have red fabric left over from when I made the red circle skirt so cut out the pattern and fabric and started to make the belt. Once sewn, turn the fabric inside out - please allow some patience for this - it made my hands have cramp but it is worth it. Top Tip: To make sharp points gently push the ends with some fabric scissors but don't push to hard or you'll go through the fabric! Once the belt was complete, I inserted the elastic through the opening in the back of the waistband. Top Tip: When threading the elastic pin one end with a nappy pin to the fabric and put a good size nappy pin on the other end. This makes it easier to thread around the waistband. Once threaded, hand sew the ends of the elastic together - make sure you do this securely. Now thread the tie belt around and hand sew the hole at the back of the waistband. The only thing left to do is hem the trousers and ta-dah - I had finished my Tofino Lounge Trousers all ready for Rhythm Riot!

All in all I would say the trousers took me about 10 hours or so. I found the pattern quite taxing but as a beginner I thought I did quite well. The most challenging part I found was connecting the waistband to the trousers and making the waistband align when stitching in the ditch (stitching in the ditch being sewing in the seam line). I failed badly on this part and had to hand sew the inside part of the waistband as I had sewn this when using the sewing machine. Again, this will take practice and as the trousers are so comfortable I will be making another pair!

Top Tips:
  • Equipment: Fabric, pins, pattern, scissors, sewing machine, button hole presser foot and thread - oh and patience!
  • Please make sure you follow the 1.5cm allowance... I think mine varied so when finished the trousers were a little snug.
  • Practice ironing the interface on a bit of scrap fabric. This will ensure you iron the right side and check out much heat needs to be applied to make it a success
  • When sewing the waistband don't forget to leave a big enough hole at the back to allow the tie belt and elastic through
  • To make sharp points gently push the ends with some fabric scissors but don't push to hard or you'll go through the fabric!
  • When threading the elastic pin (using a nappy pin) one end to the fabric and put a good size pin (again, using a nappy pin) on the other end. This makes it easier to thread around the waistband
Useful websites:
  • Tilly and the Buttons:  http://www.tillyandthebuttons.com/2013/03/finishing-seams-zigzag-stitch.html
  • 'All you need to know about machine and hand sewing - Sewing Basics' by Sandra Bardwell
Happy Sewing x

Sunday, 6 October 2013

Preparing for the Tofino Lounge Trousers by Sewaholic... including Button Holes

Tofino Pattern by Sewaholic
Hello Ladies and Gents...

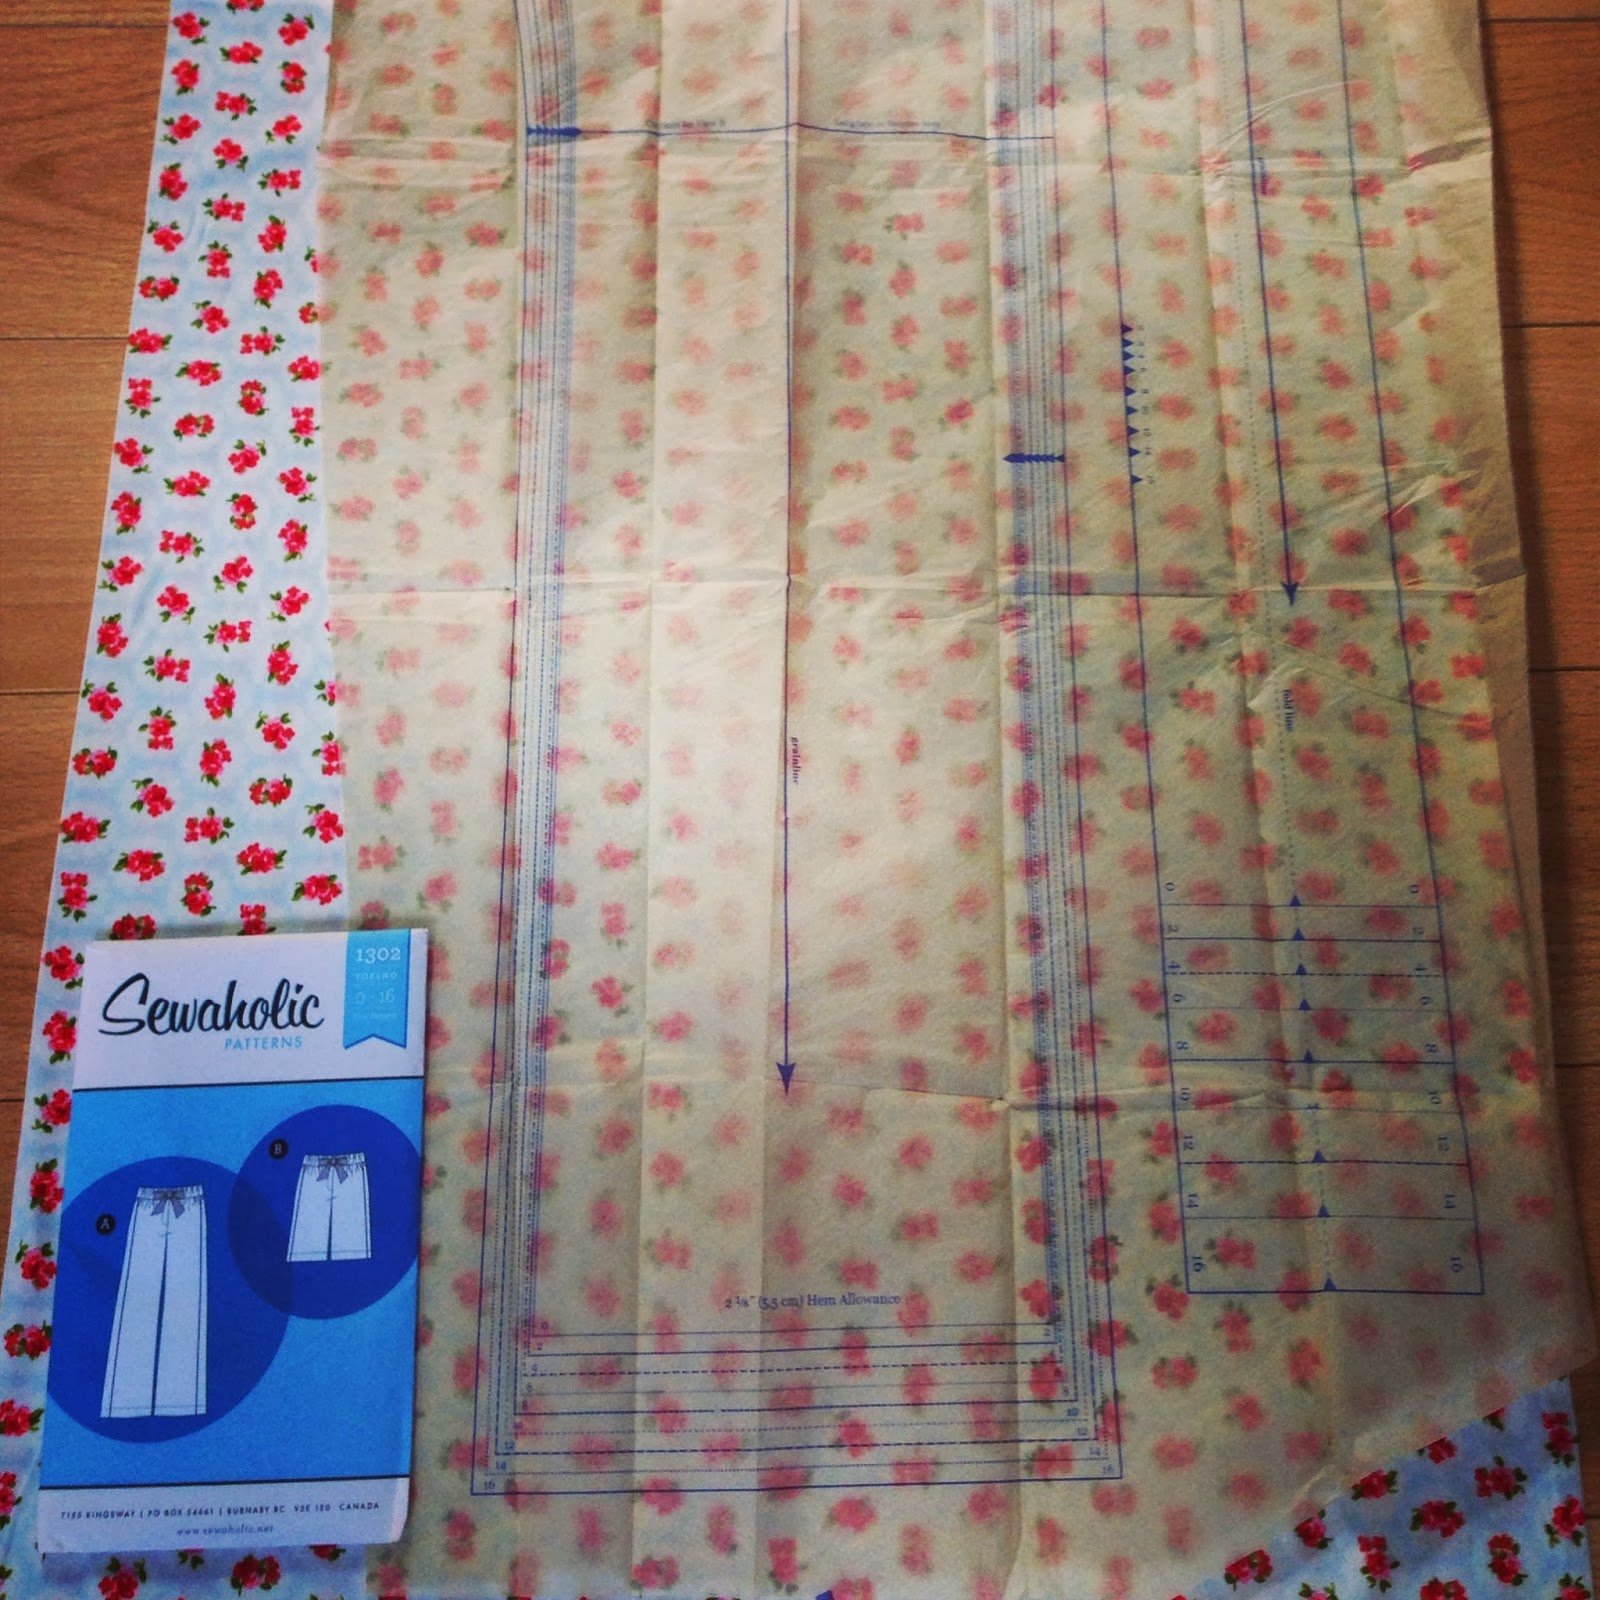
With my sewing machine clean, I could start to prepare the fabric for the Tofino Lounge Trouser pattern. I had been out to my local fabric shop (see link below) to select some gorgeous fabric for this pattern. I hunted through the racks - through gingham and flannel and cottons and spots. I wanted to used gingham for the project and spoke to the lovely shop lady who gave me some great advice. She said that gingham would look good but as I was a novice she thought a repetitive pattern would be best and move on to gingham after a bit of practice. With the hunt still
Tools for the job
on, I spotted a lovely pale blue with pink flowers on - perfect. I purchased the fabric along with a hem gauge and elastic. Happy with my purchases I headed straight home to wash the fabric ready for cutting!


After looking at the instructions on how to lay the fabric with the pattern on it, I had a dilemma on what size to cut. As mentioned in an earlier blog, this pattern is specifically made with pear shape women in mind. I looked at the size chart and could see I fluctuated between an 8 and a 10 and then to confuse me even more I looked at the finished measurements and couldn't fathom out how a 40inch hip would need a 47.5inch when finished. With me starting to worry I hadn't bought enough fabric I remembered that 'Tilly and the Buttons' had a great blog on this (see link below). After reading this (and
Checking the pattern fits!
understanding that although you are a certain measurement you wouldn't want your clothes the same size as otherwise it may stop  you breathing), I opted for a size 10, although this did not stop my dilemma as I bought fabric for a size 8! I lay the fabric on the floor and roughly lay the uncut pattern on the fabric, and phew I had enough! Top Tip: Check sizes before purchasing and also look at how long the finished item is - I was so focused on the bust/waist/hip measurement that this slipped my mind. I was lucky that the finished garment is 33 inches so just long enough for my 32inch pins.


With size selected I got snipping! I snipped all the pattern pieces out (I'm not using the contrast bits this time...I've not made a pair of trousers before and I checked it can be left out but there is always next time) and ironed it on a gentle heat. With my fabric and pattern ready, I pinned the pattern to the fabric and cut out the pieces including the notches. With the pieces all ready to go I referred back to the pattern to see how to put it all together. One of the pieces requires a button holes to thread a belt through (ok, I may do this, but piping is definitely out) and haven't done button holes before so instead of starting out sewing the pieces together, I thought I would practice button holes.

Button Hole Presser Foot
Before I started to sew I checked the manual to see if I had the right presser foot along with how to do it. I was in luck that I had the presser foot but the manual seemed a little unclear so I dug out my sewing book which it explained in better detail. The button hole foot acts as your guide and has a nifty measure lines on it. I don't actually need it for buttons, but if you do measure your buttons and add 0.3mm to ensure the button will slip in and out with ease. With the button hole foot on and fabric ready (using scraps of what I had cut out) I set the stitching in motion. My first attempt, well, was ok but it would be for a massive button. Also as my fabric is thin it made the button hole quite weak. Top Tip: If using a light weight fabric you may need some facing to strengthen it. I don't have any so used a bit of left over
Success!
wadding from my quilting project. I made a wadding sandwich and tried again, and again and again and finally the third time was a success. The second time when I went to cut the gap to make the button hole I caught the thread so weakened the button hole. The size of the hole was 1inch x 3 stitches - this was the size specified and now I've practiced I think I will be good for the real thing... best order some facing ASAP!


I can't stress enough how importing preparation is on sewing projects. If you're like me you just want to get on your machine and start stitching away. Sadly though, if you don't prep properly then the actual stitching will become more tricky. I feel now that with my fabric cut and by practicing button holes I'm now ready to move on to stitching the trousers together! Until next time...

Top Tips:

  • Equipment: Fabric, pins, pattern, scissors, sewing machine, button hole presser foot and thread
  • Check sizes before purchasing - this will ensure you buy the right amount of fabric! If in doubt, ask the shop assistant or double check!
  • Look at how long the finished item is - I was so focused on the bust/waist/hip measurement that this slipped my mind. I was lucky that the finished garment is 33 inches so just long enough for my 32inch pins
  • Button holes: If using a light weight fabric you may need some facing to strengthen it. 

Useful Websites/ books:


Happy Prepping x

Saturday, 5 October 2013

The Big Clean Up.... Sewing Machine Style

Hello Ladies and Gents...

Sewaholic Pattern
Today was going to be the day I started on my new sewing project - my Tofino Lounge Trousers (aka pyjamas) by Sewaholic. I found this pattern a little while ago and with Sewaholic specifically aiming their patterns at pear shape ladies I bought it and I've been looking forward to making it since then. I finally found some time so dug out the sewing machine. To my disgust I had put away my Singer covered in red fluff and dust (from making my red skirt...Seeing Red... Red Circles of Fabric)... the poor thing. So before I did anything I got the manual out to see how to maintain my machine.

I've cleaned it before, but it was a good four months ago and with the
Before....
thought of embarking on a new sewing project I wanted the machine to be lint and dust free and stitching like a pro. Top Tip: please check your manual on how to clean your machine as they are probably all a little different. I got manual, read through it, got all the necessary tools and I was ready to go!

The first thing is not to have the power on just in case - you don't want to electrocute yourself. With the power off, I took off the presser foot and the needle. Once removed, I started to unscrew the needle plate. When I took off the needle plate it was full of lint and grease - yuk. I took the little brush that came with my machine and with a lot of brushing and a few big breathes this part of my machine was clean.

Bobbin House
Now came the tricky part - to clean the bobbin house or hook. Remove the bobbin and flip back the retaining arms. Remove the hook race cover and hook and clean with a damp soft cloth. Top tip: Use one you don't mind getting greasy and also remember to use one that is soft and damp. Once cleaned, place to one side. Gently wipe the inside of the machine to remove any dust or excess grease. To lubricate your machine I use the Singer Super Oil which is specifically for sewing machines. Drop a couple of drops onto the hook race and move handwheel a few times. Once happy insert the hook and the hook race cover. Snap back the two hooks to hold the bits in place. Insert your bobbin, replace the needle plate, re-connect the presser foot and
Hook Race Cover & Hook
needle (it makes sense to replace it with a new needle as you've done all the hard work) and wipe down the whole machine and you are done. 
I couldn't wait to use it so I gave it a test run... it stitched like a dream! 

After...
I'm so pleased I did it because now I know that when I go to use my sewing machine, it is ready to go with a fresh needle and dust free. It literally takes about 15 minutes - 15 minutes well spent in my opinion - so what are you waiting for - get out your sewing machine and manual and get cleaning!

Happy Cleaning x