Showing posts with label Thrifty Stitcher. Show all posts

Monday, 12 August 2013

Seeing Red? Red Circles of Fabric that is!

Hello Ladies and Gent,


Tools for the job
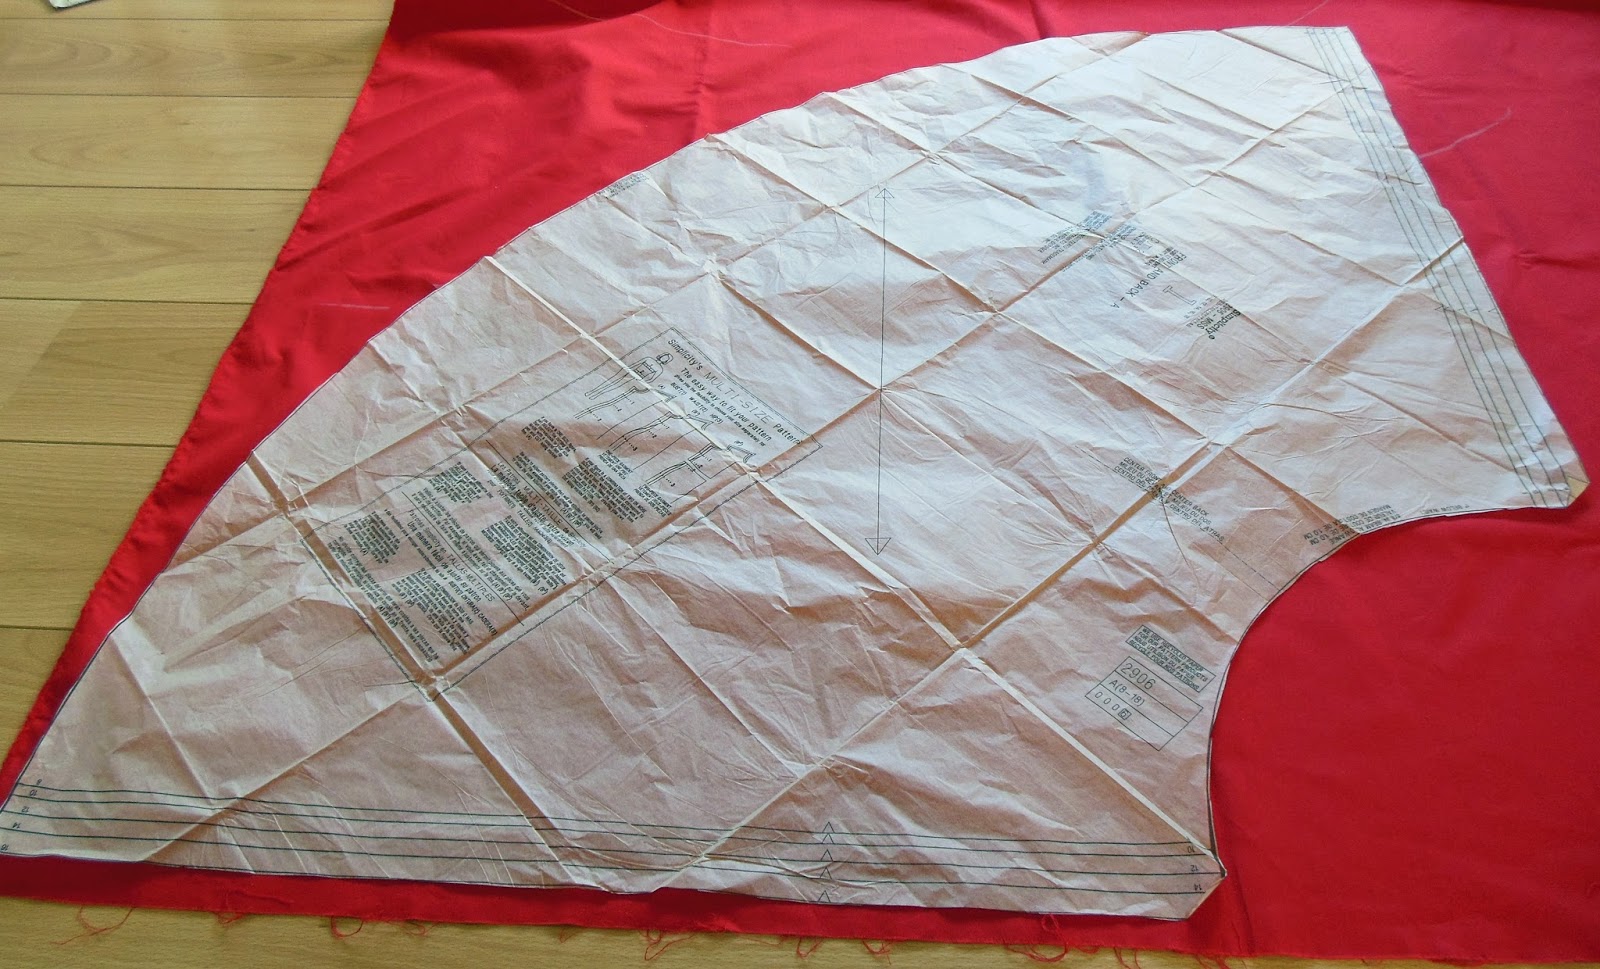
So I thought I would share with my latest sewing project... which is to attempt to make a circle skirt from a new pattern! When I went to my sewing class earlier this year, Claire-Louise aka The Thrifty Stitcher was kind enough to give me another pattern to try out at home. The pattern she gave me was the Simplicity 2906 which has two skirt patterns to follow but as I had all ready got a pattern for an 'A' line skirt I thought I ought to give the circle skirt a whirl. 

Now the dilemma of what fabric to use! I wanted to get some nice tartan fabric,
Useful hints from Sandra Bardwell
but I thought I would find matching the fabric up rather treaky so thought I better stick within my limits for now so chose a lovely crimson colour. I bought my fabric from Ray Stitch and I can't tell you how impressed I was with my visit. I called the shop the day before to see if they had the crimson fabric in stock along with a red 25cm invisible zip. I was thrilled when they said yes and told them I will see them the next day. When I arrived at 9.05am on Saturday morning they were open and had remembered my call and my goodies were all out ready for me! I was over-joyed that they had remembered and made my trip seamless (no pun intended). Now armed with my fabric (which was washed and pressed) I was ready to start creating!


Cutting lines
The first thing I did was measure myself - sadly my waist was still the same as when I made my skirt in April, but at least I've not grown in size. I took my measurement and I was a size 16 for this pattern. I cut the pattern piece out following the lines carefully and slowly. It was quite tricky as the pattern is large but I persevered  Top Tip: Gently press the pattern to ensure it is at its smoothest. I pressed the pattern when I ironed the fabric or iron it direct on a cool setting. Once cut out I then lined up the pattern on the fabric. This is when I had to remember grainlines and all that good stuff...which at first I had forgotten. I turned to my blog, Tilly and the Buttons blog as well as my good book called 'All you need to know about machine and hand sewing - Sewing Basics' by Sandra Bardwell. Although the pattern came with instructions its written in code for a novice so another Top Tip is always look up something if you are unsure of what it means. Like me I had to remind myself of the selfredge and the grain and I'm pleased I did as I originally pinned the pattern on wrong! 

I prepared my fabric (remembering to put strips of tailors chalk on the wrong
Mark the wrong side of the fabric
side of the fabric) and smoothed it by running my hand over it. Top Tip: Remember that the edge that is cut is not always 100% so don't pin the pattern against the edge. I had to look at this a few times and on the pattern you will have a long arrow which shows the grain line. In this instance the grain line was perpendicular to the selfredge. With my pattern securely pinned to the fabric, I took my fabric scissors and cut around the pattern and snipping a triangle where there were notches. The notches are there to help you line up the fabric pieces. I had to do this twice to make the front and the back piece of my skirt. Top Tip: If possible, this would be easier on a large table. I don't have this luxury but I cleared a large space on my wooden floor and cut carefully around the pattern.


Lining up the grain
Now with my fabric cut I wished I had an overlocker to stop the edges from fraying. However you can make a make-shift overlocker type thing on any sewing machine by using the zig-zag stitch. I set the machine to the longest stitch set on zig-zag and with one side sewn into the fabric and the other side just falling off the edge to catch the thread it secures the edge and helps reduce fraying. I did this to the sides and the bottom of my skirt. Tilly and the Buttons also recommends this but she does it when the hem is complete but I did it before hand - not sure if it makes a difference - time will tell.

I then double checked the instructions and realised I needed to put a 'stay stitch' in the top of the fabric to stop it from stretching. I didn't know what it was so I googled it - it is a long basting stitch that stays in - simple. So for this I set the sewing machine to a straight stitch on the longest setting and ran the stitch 1cm away from the top. Again, following the instructions I marked a 1.5cm hem down the sides with tailoring chalk in preparation for joining the pieces together and that all important invisible zip!

This is where I shall leave it today and tell you in another blog how I get on with the rest of my task! The one thing I will share is that I really enjoy the challenge this pattern is giving me! Its using the skills I have done previously plus being brave enough to try out new ones - lets hope the invisible zip comes as naturally!

Top Tips:

  • Equipment: Fabric (2m) with matching zip and thread, fabric scissors, paper scissors, tailors chalk, pins, sewing pattern, sewing machine, invisible zipper foot, general purpose zipper foot and time!
  • Gently press the pattern to ensure it is at its smoothest. I pressed the pattern when I ironed the fabric or iron it direct on a cool setting.
  • Always look up something if you are unsure of what it means. 
  • Remember that the edge that is cut is not always 100% so don't pin the pattern against the edge.
  • If possible, work on a large table. I don't have this luxury but I cleared a large space on my wooden floor and cut carefully around the pattern.

Useful Websites:


Happy Sewing xx 

Friday, 14 June 2013

Sewing, Facing and Invisible Zips.... The Finale

Dear Ladies and Gents....

Let me firstly apologies for the delay in getting the final installment to you on completing the 'A' line skirt - mostly to 'The Thrifty Stitcher', Claire-Louise - life has got in the way and now I will finish what I started.

So with all the sides overlocked it was now time to join all the pieces together. With the pieces pinned together and the sewing machine set to a straight stitch, follow the tailors chalk line to join the two back pieces to the front piece - taking the pins out as you go. Now its time to insert the invisible zip! Take the 10 inch invisible zip and line the top of the zip with the top of the skirt and mark with tailors chalk where the bottom of the zip is to go on the fabric. The zip goes right side down onto the right side of the fabric - this is then pinned into place (remembering to be 15mm away from the fabric edge). On the sewing machine change the zipper foot to an invisible zipper foot. Align the foot over the zip. To align the zip, it should go down the small hole to the left as you look at the sewing machine and stitch as close to the zip teeth as you can remember not to backstitch as it may damage the fabric and needle. Sew down the side of the zip until the place where you marked the fabric. Top Tip: You need to go as far down as you can so its secure but not too far down otherwise you will catch the zip lever and snap the needle. Also remember as there is not back stitch at either end don't forget to unpick the last loop and manually tie a knot. Now, do the same the otherside. Un-zip the zip and pin the zip to the right side of the fabric remembering to keep the same distance from the fabric edge. Top Tip: do not panic at this point! My brain could not work out how it would work, but trust me and the experts - it does! Do the same as the other side and slip the zip teeth into the right hand hole on the invisible zipper foot. You're almost there! Now swap the invisible zipper foot to a general-purpose foot. Start at the top of the zip and stitch as close as you can get and then all the way to the bottom of your skirt and ta-dah you have a skirt-ish!! I appreciate this is complex but do persevere... once done it is so satisfying! A great tutorial to help you out is 'How to sew an invisible zip' by ctquiltingvideos - link below.

Joining the facing
Now there is only a couple more part to do and one of them is fixing your facing. A facing is not required all the time but for this skirt one was inserted. To create the facings trace the pattern onto dressmakers square patterned paper using the pattern from the skirt. Before tracing remember to take out the darts and measure down approximately 3.5inches - do this for both the front piece and back two pieces. This then needs to be pinned to the fabric and cut out using fabric scissors - remember to place the front facing on the edge of folded fabric to make one long piece and cut out two back pieces. Once cut out pin the back pieces to the front pieces remember the 15mm hem line. Once the three pieces are joined together, overlock the sides and the bottom. Once overlocked, pin the right sides together at the top of the skirt. Now to ensure you don't go over you zip, mark each side with a pin - this will be your start and end point. Go back to the sewing machine and sew the facing to the skirt. Turn the facing into the skirt and its almost done!


The hem ready to the hand-stitched
The final part of the skirt is the bottom hem. As I wanted my skirt to have a more vintage feel I hand sewed this by using a herringbone stitch. I would describe this as hand sewn zig-zag stitch; only catching a tiny thread on the outer fabric and catching the hem as you go - this should also appear invisible on the outside. I decided to do this bit at home as the day was all ready drawing to a close - but one thing was for sure...I had made a skirt :)

Top tips:
  • Equipment: Hemming ruler, fabric scissors, fabric, dressmakers square patterned paper, pins, sewing machine, invisible zipper foot, invisible zip and patience!
Useful websites/ blogs:
  • 'How to sew an invisible zip' by ctquiltingvideos - http://www.youtube.com/watch?v=V2Dz6tk_fW4

Blurred photo of finished item!
I wear the stunning blue skirt regularly and its been complimented a great deal. I never appreciated the time and effort it takes to make a garment and I now have first hand stitching experience. Before I made a skirt I used to think about where my clothes were made and now this is more important than ever. I do try and buy British made where I can and that is why businesses like Vivien of Holloway and other independent shops are so important to me and to keep the British textile industry alive.

For anyone learning to sew I would highly recommend 'The Thrifty Stitcher'. The course is relaxed with clear guidance and support. The day goes so quickly and you will learn a great deal of skills in a short amount of time and retain them for years to come! Again, I'd would like to say a massive thank you to Claire-Louise and to all at The Thrifty Stitcher for a wonderful creative day - I will use all these wonderful skills to make another skirt and other clothes! 

Happy Stitching x

Thursday, 2 May 2013

Fabric Perfection


Hello Ladies and Gents…

With such a glorious day it has given me the boost to share with you the next installment about making an 'A' Line skirt. I attended a one day course ran by The Thrifty Stitcher in Stoke Newington, North London and so far I have shared with you my pearls of wisdom on pattern cutting from a beginners perspective. I will now share with you how to prepare your fabric before the big snip-snip...

Now before you cut your fabric, the fabric must be washed and pressed. The washing of the fabric will decrease the likelihood of the fabric shrinking once the garment is made – you don’t want all your hard work to shrink in the wash and come out all teeny and toasty. The pressing of the fabric will ensure it is smooth again decrease the likelihood of cutting out the wrong size pieces as after all smooth fabric is a smaller surface than creased. So, top tip: wash and press.
So with my washed and pressed fabric and with the pattern size selected we
Mark the 'Wrong Side'
turned to look at the fabric. I selected a fabric that was plain, but spoke volumes in colour as it was such a vibrant royal blue. A plain colour is quite difficult to decide which side is the ‘right-side’ of the fabric. With close examination, it is the side that is the smoothest appearance. 
Top tip: Once you know which is the ‘right-side’ put strips of tailors chalk on the ‘wrong-side’ – this easily identifies what side is which and will reduce the likelihood of stitching the wrong sides together. I folded the fabric in half (wrong-sides together) and smoothed the fabric over with my hand. To ensure the fabric is aligned line up the selvedge edges and not the edges that are fraying - this will normally highlight if the fabric has been cut straight. I placed the front pattern piece on the fold – this is so there are no seams at the front of the skirt and to follow the grain. I then placed the back piece on the fabric.

Now, this part is quite complex for my little brain to deal with, but I will do my
Ready for the Snip!
best to explain. With the front piece being on the fold, it naturally follows the grain line as you have smoothed the fabric so that the selvedge edges are aligned. For the back piece you need to align the pattern with the grain. On the pattern it will highlight the direction of the grainline – this needs to be straight and follow the direction of the thread. I measured the distance between the top-edge as the pattern needs to be the same distance to ensure the fabric grain is correct. A great blog that also explains this is by Tilly and the Button called Before You Cut Your Fabric - link below. With my fabric ready I placed my pattern onto my it and pinned into place... ready to be cut.

This phase taught me a great deal about the fabric itself - about the selvedge, grain, grainlines, etc - all adding to memory banks for future reference! Next time I will blog about cutting the fabric and pinning....

Top tips:
  • Equipment: Washing machine, iron, fabric, tailors chalk, pins and sewing pattern
  • Wash and press
  • Once you know which is the ‘right-side’ put strips of tailors chalk on the ‘wrong-side’ – this easily identifies what side is which and will reduce the likelihood of stitching the wrong sides together

Useful websites/ blogs:

Again, I'd would like to say a massive thank you to Claire-Louise and to all at The Thrifty Stitcher for a wonderful creative day.

Happy Fabric Time x

Sunday, 21 April 2013

Patterns, Measurements and Maths

Hello Ladies and Gentlemen...

Let me firstly apologies for not blogging sooner... it's been two weeks since I shared with you my adventures but I do have a genuine excuse...it was my birthday! I had a super weekend and birthday day thanks to my husbandy and friends. I was spoilt rotten which can't be a bad thing. I'm now back and spreading the love.

Since my last sewing blog, I have made a few other bits and pieces - primarily involving squares! But my skills were well and truly put to the test when I attended an all day sewing course that involved making an 'A' line skirt. In a previous blog on sewing, I mentioned a great website called 'The Thrifty Stitcher' which has lots of hints and tips to help with sewing projects. The Thrifty Stitcher is an friendly sewing school ran by Claire-Louise Hardie who was a consultant to the BBC2 programme 'The Great British Sewing Bee'. She runs evening, half days and day courses for all levels to try and de-mystify the art of sewing. So with all these exciting courses to chose from I selected the 'An Introduction to Dress Making - Making a Skirt' (link below). 

Fabric Made in UK
Once booked, an email came through of what to expect from the day and what to bring. The key items to bring were fabric, an invisible zip and thread to match the fabric. With these instructions I jumped straight onto the 'Ray Stitch' website where I clicked and examined all the glorious fabrics they had on offer. When it came to the actual selection I remembered the first episode of the GBSB and decided not to get a complex pattern or anything too lightweight! So I selected a truly stunning shade of royal blue in a medium weight cotton (made in the UK) with matching zip and thread.

Thrifty Stitcher HQ
Soon the time passed and the day arrived to head over to Thrifty Stitcher HQ in Stoke Newington. Travel links are simple and they are very, very clear on the website with great photos to help you locate landmarks. I traveled to Highbury and Islington station, hopped on a local bus and after 2 minute walk from the bus I was there.  I entered the building and was greeted by Claire-Louise aka 'The Thrifty Stitcher'. The room had a lovely set up with a big sewing table, sewing machines, over-lockers, samples, fabric, toiles - everything you would expect to see in a sewing room!  I was soon settled down with a cup of tea and chatting away. Some other sewing bees arrived (four in total and the maximum size class) and soon we were all examining each others fabrics. With the creative juices flowing the class began....

Now the plan is to split the day over a series blog. I had to take in a great deal of tips, hints and skills and to get the full benefit from it and not to lose you by reading streams of text, I will break them down into smaller chunks. So, this blog starts at the beginning by focusing on patterns and pattern cutting...

'A' line skirt pattern
The stitching aim of the day was to make an 'A' line skirt. This being my first pattern I have ever cut I was both a little excited and nervous. The skirt pattern is by Butterick (B4461). However before the pattern was released from the packet we needed to be measured. With Claire-Louise armed with a tape measure I had my waist and hips measured. Top tip: If taking measurements, take the measurements from the side of the person and not the front - it will save a lot of embarrassment when you have your face in a strangers crotch! 


Size guide

To select the size of the pattern look at the waist and hip measurements closest to your size (normally located on the back of the packet). If you like a snug fit, go for a size down or if you like a loose fit go for a size up. Top tip: Check the waistline on the pattern itself as it actually tells you how much 'give' it will have once made. A great blog that goes into more detail is by 'Tilly and the Buttons' called 'How to select your sewing  pattern size' (link below). Top tip: Don't worry of you make it larger - it is generally easier to take fabric away than add in. My measurements were a 30" waist and a 41"hip. After checking the guidelines we decided to follow a size 14 pattern (as I like a snug fit) and add an extra 2" to the waist.  To add the 2" to the pattern add 0.5" the front and back piece. (NB: this calculation is based on 2"/4 as you work on four pieces of fabric). 

Adding width
With the packet now in my hands, I opened it and started to make the personal adjustments to the pattern. I added a half of an inch to the front and back piece. To ensure it blended nicely back into the pattern I used a dress making curved ruler and a pencil. Once this was done I cut out the pattern - slowly and accurately. Once cut out it was now time to look at the length. As I wear 1950s/ vintage style clothes I wanted an on-the knee length. To achieve this 5" were added to the pattern. Now I thought this would just be added to the bottom of the pattern - WRONG! On the pattern there is a line that says
Adding length
'lengthen or shorten here' - this is where the additional 5" will be added. Tracing paper can be used but we used a dressmakers square patterned paper. The pattern was cut along the line and pinned to a sewing board that had inches clearly marked on it. The extra pattern paper was inserted and taped (using scotch tape). To ensure continuity a small side piece had to be added and again I used the dressmakers ruler to smooth the curve. The extra paper was cut off and ta-dah I had my finished pattern.

Being my first item made from a pattern I was surprised at the amount of preparation it took even to make the pattern the correct size. I took for granted that a pattern was taken out of the packet, attached to fabric and that was it - boy, was I wrong. Even making sure the pattern fits correctly by adding extra inches to the waist and length takes time but I suppose it's like all things - make sure the preparation is correct and the rest should be easy (well, you will have to wait for the next bit!). Next time I'll look at the fabric and starting to make the skirt!

Top tips:
  • Equipment: Pattern, dress makers ruler (or a long ruler), hemming ruler, tape measure pencil, scissors, calculator and a cutting mat. You may also need additional dressmakers paper and scotch tape depending if any alterations are required
  • Take body measurements from the side and not the front - it will save a lot of embarrassment when you have your face in a strangers crotch!
  •  Don't worry of you make it larger - it is generally easier to take fabric away than add in.
  • Check the waistline on the pattern as it actually tells you how much 'give' it will have once made
Useful websites/ blogs:


I'd would like to say a massive thank you to Claire-Louise and to all at The Thrifty Stitcher for a wonderful creative day - I will definitely be back for the dress making day! 

Happy Pattern Cutting x

Saturday, 9 March 2013

Fabric Websites, Shops & Blogs I Love....

Hello Ladies and Gents,
Bill Murray and a beaver

Today is a dull, dank and dark day with the skies full of thick grey cloud...it has been so grey these last few days its been like a scene from Groundhog Day. As the weather is sooooo depressing the only thing to do is to look at fabric websites and dream about my next projects....

With my next projects simmering in the background (shower cap bloggie coming soon) I thought I would share with you websites that I truly love and have set me in good stead on my stitching journey. They will be split into four areas:

  • Online
  • Fabric shops
  • Haberdashery shops
  • Blogs & websites

So lets begin...

Online

Fabric Rehab - http://www.fabricrehab.co.uk/
This is a great online store that sells a wide range of fabrics from lightweight to heavyweight. They describe the fabric really well and take great quality photos and try to scale where possible - they also have good offers on bundles too. The delivery of the fabric is quick and if you feel you have made a mistake there is a number you can call and they are always helpful.

Fabric shops

Tikki - http://www.tikkilondon.com/
A great little shop in Kew (South West London) that specialises in quilting and patchwork and also sells an array of glorious fabrics. This shop is my nearest and I only discovered it today so definitely will be back to have a thorough look around (I only popped in today for some elastic). Its good to know I've a great shop on my doorstep (20 minute walk, or 5 mins on the bus!) as before I had to go into town if I forgot something.

Ray Stitch - http://www.raystitch.co.uk/
This shop in Islington (North East London) is a shop of fabric magic. It has a great selection of fabrics and a small haberdashery plus a cafe! The shop is neatly presented and the staff are very helpful. They also run classes for all skill types and I hopefully will be booking myself on one soon.

Liberty - http://www.liberty.co.uk/
To me, Liberty is a truly magnificent shop - having more to offer than cosmetics and clothes. The fabric range is dreamy and I love the fact that some of it is made in UK still. The prints are wonderful and I will purchase something from here soon to make something for my husbandy...

As my passion for sewing is growing all the time I need to get my fabric fix when I can. If I know me and husbandy are going on a day trip I search the web to see if they have any sewing shops... below are some little gems I have found so far...

The Sewing Shop Canterbury - http://www.thesewingshopcanterbury.co.uk/
This shop is a cutsie shop that is situated near the heart of Canterbury. Here I found some great 1950 print fabric but I didn't buy any at the time - oh well it just means I have to go back! 

The Brighton Sewing Centre - http://www.brightonsewingcentre.co.uk/
This shop is only 5 mins from the train station. Again it has a great selection of fabrics and also the added bonus of specialising in Berina sewing machines. The shop is neatly presented and friendly staff.

Haberdashery

Macculloch and Wallis - http://www.macculloch-wallis.co.uk/
Macculloch and Wallis is situated in the centre of London (just off Oxford Street) and sells a superb range of fabrics. The fabrics are totally wonderful but I love Macculloch and Wallis for it's haberdashery. If you think you can't find what you're looking for in the haberdashery world then look no further - they have more buttons, elastic, trimmings, craft tools, etc than you could possibly dream about. It always has what I want and I think it will do you for you too.

Blogs and websites

The Thirfty Stitcher - http://www.thethriftystitcher.co.uk/

This website really helped me on my way to start my sewing journey. The tutorials are clear and precise and offer great hints and tips on where to buy things and how to make things. Again, they offer tutorials ranging from beginners to advance so I may have to book myself on a beginners course soon!

Quilting along the Grain - http://quiltingalongthegrain.blogspot.co.uk/
I love the style of this blog...and this is what partly inspired me to do my blog today (a good blog on grey material). This blog offers great hints and tips and is always a good read!

Handmade Jane - http://handmadejane.blogspot.co.uk/
This blog always makes me smile and I love the photos used....Austin Powers, Percy from Blackadder 2.... I also used her blog to make my Mother-in-Law's wash bag (which was well received so big smiles all round). Great tutorials which are clear and concise - good for beginners!

There are a lot of websites, shops and blogs in the sewing world and I have shared with you the ones I have experienced so far. If there is not one here that suits you then get googling! As I said at the beginning of this blog, these websites, shops and blogs have set me in good stead at the start of my sewing journey and hopefully they will do for you too. 

Happy Stitching x

P.S. The piccie below is taken the same time last year (10/03/12)...what a difference in the weather!

Sunny March 2012

Thursday, 10 January 2013

The Sewing Machine


Hi Ladies and Gentlemen…

To date I have bought my essential bits for my sewing tool kit and now my attention turns to the main item – the sewing machine. Sewing machines were first patented in the 1790s and Mr Singer commercialised the sewing machine in the 1850s giving everyone the opportunity to sew and stitch at home and now there are many different brands covering a wide range of functions and prices. This was my first hurdle as I did not appreciate there was such a variety - all targeted at different skill level and functionality – I thought it was one size fits all. In some ways I was pleased so I did not have to get an all singing all dancing machine that would leave me in a mess and not continue 
with my goal.

A good friend of mine, who is a stitching wizz, said as long as it has 10 or so stitches and can do some button holes it will be a good beginning machine. With this sound advice (and advice from my sewing book and the Thrifty Stitcher website) I looked extensively over the World Wide Web at Singer, Berina, Brother, Janome and other brands. I started to get overwhelmed at the possibility and found a few I thought would fit the stitch. But then I thought - how large are they and what do they actually feel like? So with list in hand I went to John Lewis on Oxford Street. Here they offer a great range of sewing machines (including their own brand) and I was able to touch and caress the machines there. I like square machines over rounded (this principle also applies to cars – especially old Fords – but I digress) and I liked the fact that the ones I viewed were not that heavy and also not too expensive. With this in mind I was a bit blinkered to the task at hand and not focusing on the functionality. Then the sewing machine which I had researched was there and in my grasp and it was the……

Singer 2250

It was like love at first glance – I knew this would suit my capabilities to the ground (which are basic in sewing), matched my price tag (always a good thing to keep the husbandy happy), did not weigh a tonne (so I did not incur an injury getting it home), small enough to fit in the space allocated at home (although now I have made my favourite shoes homeless).

When I got the Singer 2250 home I took it out of the box and made sure all the items were there (which they were plus an extra bobbin) and read the manual…. I wanted to thread it and get cracking but it was getting late, I had no scrap material to test on and other general life things needed to be done – boo.

So now I am all set to go… sewing tool box and sewing machine. I just need to cut up on old bed sheet and start practicing…. Oh I can’t wait!!