Showing posts with label Ray Stitch. Show all posts

Monday, 12 August 2013

Seeing Red? Red Circles of Fabric that is!

Hello Ladies and Gent,


Tools for the job
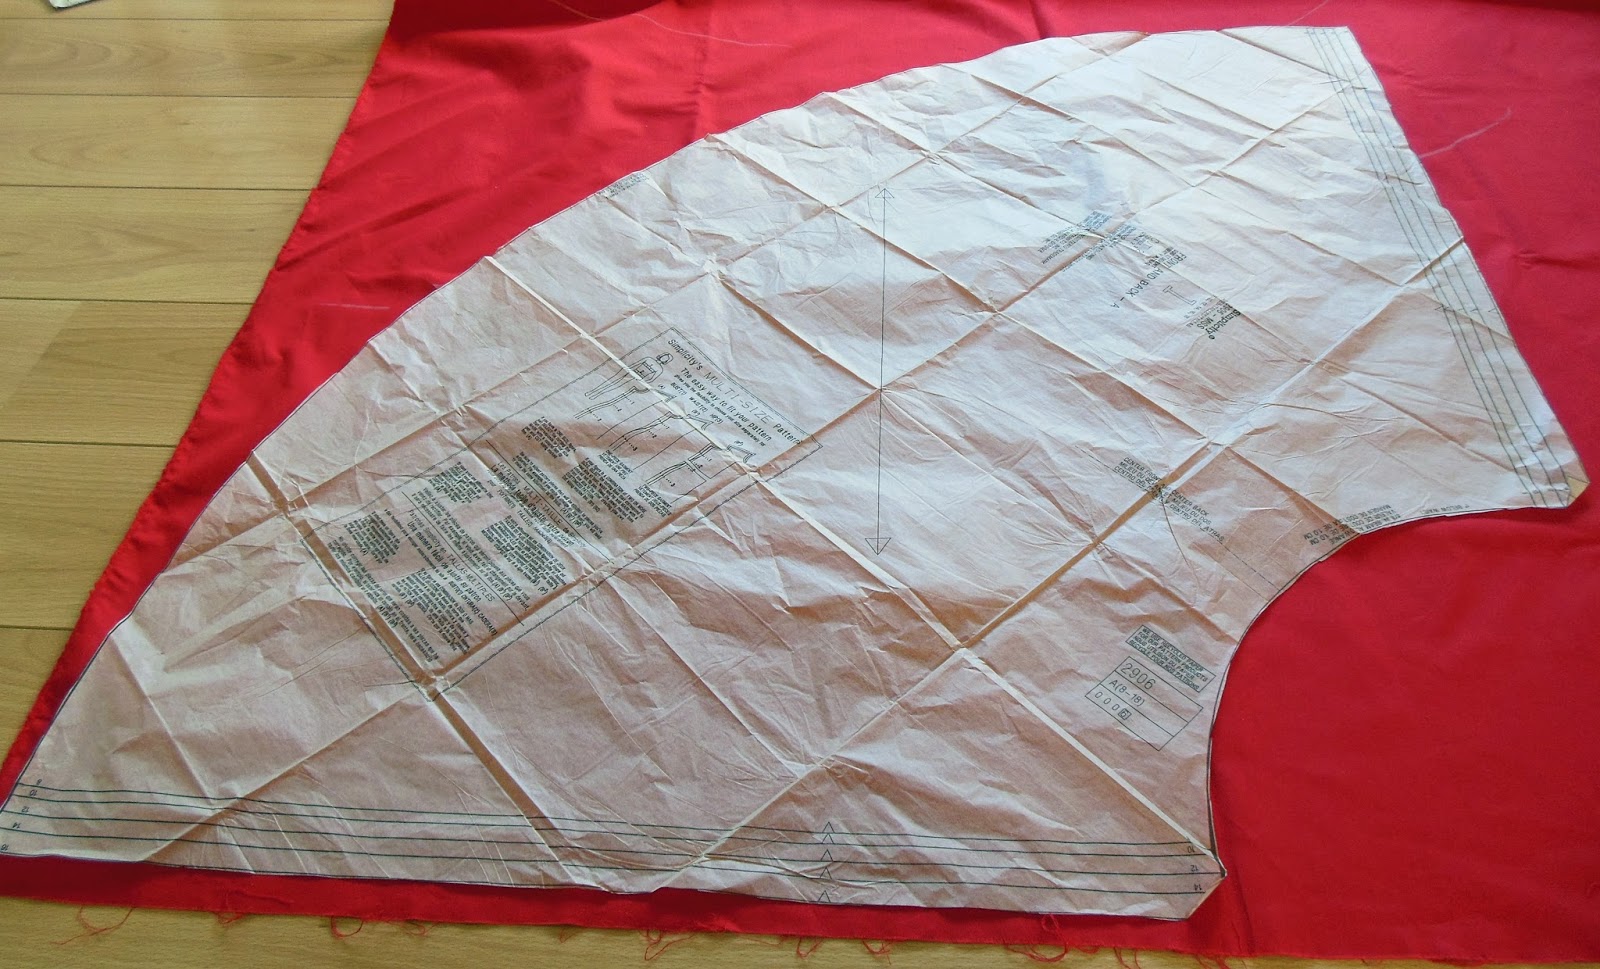
So I thought I would share with my latest sewing project... which is to attempt to make a circle skirt from a new pattern! When I went to my sewing class earlier this year, Claire-Louise aka The Thrifty Stitcher was kind enough to give me another pattern to try out at home. The pattern she gave me was the Simplicity 2906 which has two skirt patterns to follow but as I had all ready got a pattern for an 'A' line skirt I thought I ought to give the circle skirt a whirl. 

Now the dilemma of what fabric to use! I wanted to get some nice tartan fabric,
Useful hints from Sandra Bardwell
but I thought I would find matching the fabric up rather treaky so thought I better stick within my limits for now so chose a lovely crimson colour. I bought my fabric from Ray Stitch and I can't tell you how impressed I was with my visit. I called the shop the day before to see if they had the crimson fabric in stock along with a red 25cm invisible zip. I was thrilled when they said yes and told them I will see them the next day. When I arrived at 9.05am on Saturday morning they were open and had remembered my call and my goodies were all out ready for me! I was over-joyed that they had remembered and made my trip seamless (no pun intended). Now armed with my fabric (which was washed and pressed) I was ready to start creating!


Cutting lines
The first thing I did was measure myself - sadly my waist was still the same as when I made my skirt in April, but at least I've not grown in size. I took my measurement and I was a size 16 for this pattern. I cut the pattern piece out following the lines carefully and slowly. It was quite tricky as the pattern is large but I persevered  Top Tip: Gently press the pattern to ensure it is at its smoothest. I pressed the pattern when I ironed the fabric or iron it direct on a cool setting. Once cut out I then lined up the pattern on the fabric. This is when I had to remember grainlines and all that good stuff...which at first I had forgotten. I turned to my blog, Tilly and the Buttons blog as well as my good book called 'All you need to know about machine and hand sewing - Sewing Basics' by Sandra Bardwell. Although the pattern came with instructions its written in code for a novice so another Top Tip is always look up something if you are unsure of what it means. Like me I had to remind myself of the selfredge and the grain and I'm pleased I did as I originally pinned the pattern on wrong! 

I prepared my fabric (remembering to put strips of tailors chalk on the wrong
Mark the wrong side of the fabric
side of the fabric) and smoothed it by running my hand over it. Top Tip: Remember that the edge that is cut is not always 100% so don't pin the pattern against the edge. I had to look at this a few times and on the pattern you will have a long arrow which shows the grain line. In this instance the grain line was perpendicular to the selfredge. With my pattern securely pinned to the fabric, I took my fabric scissors and cut around the pattern and snipping a triangle where there were notches. The notches are there to help you line up the fabric pieces. I had to do this twice to make the front and the back piece of my skirt. Top Tip: If possible, this would be easier on a large table. I don't have this luxury but I cleared a large space on my wooden floor and cut carefully around the pattern.


Lining up the grain
Now with my fabric cut I wished I had an overlocker to stop the edges from fraying. However you can make a make-shift overlocker type thing on any sewing machine by using the zig-zag stitch. I set the machine to the longest stitch set on zig-zag and with one side sewn into the fabric and the other side just falling off the edge to catch the thread it secures the edge and helps reduce fraying. I did this to the sides and the bottom of my skirt. Tilly and the Buttons also recommends this but she does it when the hem is complete but I did it before hand - not sure if it makes a difference - time will tell.

I then double checked the instructions and realised I needed to put a 'stay stitch' in the top of the fabric to stop it from stretching. I didn't know what it was so I googled it - it is a long basting stitch that stays in - simple. So for this I set the sewing machine to a straight stitch on the longest setting and ran the stitch 1cm away from the top. Again, following the instructions I marked a 1.5cm hem down the sides with tailoring chalk in preparation for joining the pieces together and that all important invisible zip!

This is where I shall leave it today and tell you in another blog how I get on with the rest of my task! The one thing I will share is that I really enjoy the challenge this pattern is giving me! Its using the skills I have done previously plus being brave enough to try out new ones - lets hope the invisible zip comes as naturally!

Top Tips:

  • Equipment: Fabric (2m) with matching zip and thread, fabric scissors, paper scissors, tailors chalk, pins, sewing pattern, sewing machine, invisible zipper foot, general purpose zipper foot and time!
  • Gently press the pattern to ensure it is at its smoothest. I pressed the pattern when I ironed the fabric or iron it direct on a cool setting.
  • Always look up something if you are unsure of what it means. 
  • Remember that the edge that is cut is not always 100% so don't pin the pattern against the edge.
  • If possible, work on a large table. I don't have this luxury but I cleared a large space on my wooden floor and cut carefully around the pattern.

Useful Websites:


Happy Sewing xx 

Sunday, 21 April 2013

Patterns, Measurements and Maths

Hello Ladies and Gentlemen...

Let me firstly apologies for not blogging sooner... it's been two weeks since I shared with you my adventures but I do have a genuine excuse...it was my birthday! I had a super weekend and birthday day thanks to my husbandy and friends. I was spoilt rotten which can't be a bad thing. I'm now back and spreading the love.

Since my last sewing blog, I have made a few other bits and pieces - primarily involving squares! But my skills were well and truly put to the test when I attended an all day sewing course that involved making an 'A' line skirt. In a previous blog on sewing, I mentioned a great website called 'The Thrifty Stitcher' which has lots of hints and tips to help with sewing projects. The Thrifty Stitcher is an friendly sewing school ran by Claire-Louise Hardie who was a consultant to the BBC2 programme 'The Great British Sewing Bee'. She runs evening, half days and day courses for all levels to try and de-mystify the art of sewing. So with all these exciting courses to chose from I selected the 'An Introduction to Dress Making - Making a Skirt' (link below). 

Fabric Made in UK
Once booked, an email came through of what to expect from the day and what to bring. The key items to bring were fabric, an invisible zip and thread to match the fabric. With these instructions I jumped straight onto the 'Ray Stitch' website where I clicked and examined all the glorious fabrics they had on offer. When it came to the actual selection I remembered the first episode of the GBSB and decided not to get a complex pattern or anything too lightweight! So I selected a truly stunning shade of royal blue in a medium weight cotton (made in the UK) with matching zip and thread.

Thrifty Stitcher HQ
Soon the time passed and the day arrived to head over to Thrifty Stitcher HQ in Stoke Newington. Travel links are simple and they are very, very clear on the website with great photos to help you locate landmarks. I traveled to Highbury and Islington station, hopped on a local bus and after 2 minute walk from the bus I was there.  I entered the building and was greeted by Claire-Louise aka 'The Thrifty Stitcher'. The room had a lovely set up with a big sewing table, sewing machines, over-lockers, samples, fabric, toiles - everything you would expect to see in a sewing room!  I was soon settled down with a cup of tea and chatting away. Some other sewing bees arrived (four in total and the maximum size class) and soon we were all examining each others fabrics. With the creative juices flowing the class began....

Now the plan is to split the day over a series blog. I had to take in a great deal of tips, hints and skills and to get the full benefit from it and not to lose you by reading streams of text, I will break them down into smaller chunks. So, this blog starts at the beginning by focusing on patterns and pattern cutting...

'A' line skirt pattern
The stitching aim of the day was to make an 'A' line skirt. This being my first pattern I have ever cut I was both a little excited and nervous. The skirt pattern is by Butterick (B4461). However before the pattern was released from the packet we needed to be measured. With Claire-Louise armed with a tape measure I had my waist and hips measured. Top tip: If taking measurements, take the measurements from the side of the person and not the front - it will save a lot of embarrassment when you have your face in a strangers crotch! 


Size guide

To select the size of the pattern look at the waist and hip measurements closest to your size (normally located on the back of the packet). If you like a snug fit, go for a size down or if you like a loose fit go for a size up. Top tip: Check the waistline on the pattern itself as it actually tells you how much 'give' it will have once made. A great blog that goes into more detail is by 'Tilly and the Buttons' called 'How to select your sewing  pattern size' (link below). Top tip: Don't worry of you make it larger - it is generally easier to take fabric away than add in. My measurements were a 30" waist and a 41"hip. After checking the guidelines we decided to follow a size 14 pattern (as I like a snug fit) and add an extra 2" to the waist.  To add the 2" to the pattern add 0.5" the front and back piece. (NB: this calculation is based on 2"/4 as you work on four pieces of fabric). 

Adding width
With the packet now in my hands, I opened it and started to make the personal adjustments to the pattern. I added a half of an inch to the front and back piece. To ensure it blended nicely back into the pattern I used a dress making curved ruler and a pencil. Once this was done I cut out the pattern - slowly and accurately. Once cut out it was now time to look at the length. As I wear 1950s/ vintage style clothes I wanted an on-the knee length. To achieve this 5" were added to the pattern. Now I thought this would just be added to the bottom of the pattern - WRONG! On the pattern there is a line that says
Adding length
'lengthen or shorten here' - this is where the additional 5" will be added. Tracing paper can be used but we used a dressmakers square patterned paper. The pattern was cut along the line and pinned to a sewing board that had inches clearly marked on it. The extra pattern paper was inserted and taped (using scotch tape). To ensure continuity a small side piece had to be added and again I used the dressmakers ruler to smooth the curve. The extra paper was cut off and ta-dah I had my finished pattern.

Being my first item made from a pattern I was surprised at the amount of preparation it took even to make the pattern the correct size. I took for granted that a pattern was taken out of the packet, attached to fabric and that was it - boy, was I wrong. Even making sure the pattern fits correctly by adding extra inches to the waist and length takes time but I suppose it's like all things - make sure the preparation is correct and the rest should be easy (well, you will have to wait for the next bit!). Next time I'll look at the fabric and starting to make the skirt!

Top tips:
  • Equipment: Pattern, dress makers ruler (or a long ruler), hemming ruler, tape measure pencil, scissors, calculator and a cutting mat. You may also need additional dressmakers paper and scotch tape depending if any alterations are required
  • Take body measurements from the side and not the front - it will save a lot of embarrassment when you have your face in a strangers crotch!
  •  Don't worry of you make it larger - it is generally easier to take fabric away than add in.
  • Check the waistline on the pattern as it actually tells you how much 'give' it will have once made
Useful websites/ blogs:


I'd would like to say a massive thank you to Claire-Louise and to all at The Thrifty Stitcher for a wonderful creative day - I will definitely be back for the dress making day! 

Happy Pattern Cutting x

Saturday, 9 March 2013

Fabric Websites, Shops & Blogs I Love....

Hello Ladies and Gents,
Bill Murray and a beaver

Today is a dull, dank and dark day with the skies full of thick grey cloud...it has been so grey these last few days its been like a scene from Groundhog Day. As the weather is sooooo depressing the only thing to do is to look at fabric websites and dream about my next projects....

With my next projects simmering in the background (shower cap bloggie coming soon) I thought I would share with you websites that I truly love and have set me in good stead on my stitching journey. They will be split into four areas:

  • Online
  • Fabric shops
  • Haberdashery shops
  • Blogs & websites

So lets begin...

Online

Fabric Rehab - http://www.fabricrehab.co.uk/
This is a great online store that sells a wide range of fabrics from lightweight to heavyweight. They describe the fabric really well and take great quality photos and try to scale where possible - they also have good offers on bundles too. The delivery of the fabric is quick and if you feel you have made a mistake there is a number you can call and they are always helpful.

Fabric shops

Tikki - http://www.tikkilondon.com/
A great little shop in Kew (South West London) that specialises in quilting and patchwork and also sells an array of glorious fabrics. This shop is my nearest and I only discovered it today so definitely will be back to have a thorough look around (I only popped in today for some elastic). Its good to know I've a great shop on my doorstep (20 minute walk, or 5 mins on the bus!) as before I had to go into town if I forgot something.

Ray Stitch - http://www.raystitch.co.uk/
This shop in Islington (North East London) is a shop of fabric magic. It has a great selection of fabrics and a small haberdashery plus a cafe! The shop is neatly presented and the staff are very helpful. They also run classes for all skill types and I hopefully will be booking myself on one soon.

Liberty - http://www.liberty.co.uk/
To me, Liberty is a truly magnificent shop - having more to offer than cosmetics and clothes. The fabric range is dreamy and I love the fact that some of it is made in UK still. The prints are wonderful and I will purchase something from here soon to make something for my husbandy...

As my passion for sewing is growing all the time I need to get my fabric fix when I can. If I know me and husbandy are going on a day trip I search the web to see if they have any sewing shops... below are some little gems I have found so far...

The Sewing Shop Canterbury - http://www.thesewingshopcanterbury.co.uk/
This shop is a cutsie shop that is situated near the heart of Canterbury. Here I found some great 1950 print fabric but I didn't buy any at the time - oh well it just means I have to go back! 

The Brighton Sewing Centre - http://www.brightonsewingcentre.co.uk/
This shop is only 5 mins from the train station. Again it has a great selection of fabrics and also the added bonus of specialising in Berina sewing machines. The shop is neatly presented and friendly staff.

Haberdashery

Macculloch and Wallis - http://www.macculloch-wallis.co.uk/
Macculloch and Wallis is situated in the centre of London (just off Oxford Street) and sells a superb range of fabrics. The fabrics are totally wonderful but I love Macculloch and Wallis for it's haberdashery. If you think you can't find what you're looking for in the haberdashery world then look no further - they have more buttons, elastic, trimmings, craft tools, etc than you could possibly dream about. It always has what I want and I think it will do you for you too.

Blogs and websites

The Thirfty Stitcher - http://www.thethriftystitcher.co.uk/

This website really helped me on my way to start my sewing journey. The tutorials are clear and precise and offer great hints and tips on where to buy things and how to make things. Again, they offer tutorials ranging from beginners to advance so I may have to book myself on a beginners course soon!

Quilting along the Grain - http://quiltingalongthegrain.blogspot.co.uk/
I love the style of this blog...and this is what partly inspired me to do my blog today (a good blog on grey material). This blog offers great hints and tips and is always a good read!

Handmade Jane - http://handmadejane.blogspot.co.uk/
This blog always makes me smile and I love the photos used....Austin Powers, Percy from Blackadder 2.... I also used her blog to make my Mother-in-Law's wash bag (which was well received so big smiles all round). Great tutorials which are clear and concise - good for beginners!

There are a lot of websites, shops and blogs in the sewing world and I have shared with you the ones I have experienced so far. If there is not one here that suits you then get googling! As I said at the beginning of this blog, these websites, shops and blogs have set me in good stead at the start of my sewing journey and hopefully they will do for you too. 

Happy Stitching x

P.S. The piccie below is taken the same time last year (10/03/12)...what a difference in the weather!

Sunny March 2012

Sunday, 24 February 2013

Wall Tidy Dilemma!

Hello Ladies and Gentlemen,

With the weather lingering at freezing temperatures I could not face going out so I thought I would make a much needed wall tidy. In my bedroom I have a shelf which is crammed full of hair products, hair brushes, hair grips - basically the hair offering from Boots on a shelf that is about a a foot long by a quarter foot wide. This drives both my husbandy and I nuts so thought a wall tidy would do the trick.


Tools for the job
So with a fabric delivery of a whole host of yummy material on Friday  I selected one to be the background (being green with cream spots) and popped to Ray Stitch (love this shop) to get a half a metre of plain cream  cotton to be the pockets. With all the ingredients ready I was good to get stitching.

I didn't follow any pattern.... I just measured where I wanted it to go (being 12inch x 25inch) and added an extra couple of inches and cut the spotty fabric. The reason I added the inches is because you will need to hem and mitre the fabric and as I've learnt by doing corners this way it will use more fabric. I decided I needed one large pocket at the top for my hairbrushes and a smaller one for my grips and bits. I measured the cream fabric to 10inch x 14inch for the large pocket and 10inch x 9 inch for the smaller one.


Hemming
I hemmed and mitred all three pieces of fabric (check out my blog Mitered Corners and Headscarf Success! to show how this is done) and then went to pin the pockets onto the fabric. This is when my idea went wrong.... I had made the pockets too big and could not work out how to attach them. This is really hard to explain but tip: always research what you are going to make! I have only been stitching for two months and although I was pleased I felt confident enough to venture forth on my own, I was sadly mistaken and my stitching heaven soon turned into an unpicking hell. I just could not fathom out how to do this so I went onto 'You Tube' and searched 'wall tidy sewing'. After a couple of attempts of following other tutorials I stumbled across one by Sewing Republic called 'Closet Organizer' (link below):


http://www.youtube.com/watch?v=zLKu-ukprgA&list=PLG-EZUMWlx6fdibG2Hm2GfnmUC6t9VBNF&index=4


This link basically saved my bacon and after a few minor alterations to the pocket pieces, I pinned the pocket fabric onto the backing piece and sewed together to make my finished wall tidy! All I need to do now is purchase the Prym eyelets and washers plus a couple of suction hooks and this little beauty will be good to go!


Finished wall tidy
All in all I have learnt a few lessons today. I never realised I had so much patience and my new journey of sewing is finding out new things about me. I wonder what other talents and traits it will unearth....

Hint and tips

  • Equipment: Iron, cutting board, metal ruler, rotary cutter, fabric scissors, tape measure, fabric, pins, tailors chalk, thread and a sewing machine
  • Sewing pattern or tutorial - this will save you a lot of stress - especially as you are new to the sewing world. I will not venture forth without one again - or definitely not in the near future
  • Patience - Again, I mention this every time but as I'm setting out on this adventure I can't stress it enough!
  • When doing mitred corners don't forget to make your project slightly larger to allow for the  hem.
Enjoy and take your time!

Happy Stitching x

Wednesday, 30 January 2013

Sharing the Sewing Passion


Good evening Ladies and Gentlemen,

Since making my beautiful headscarf on Saturday, I have been wearing it with pride. I wore it all day on Sunday and found it extremely comfortable - making this stitching project a further success. This has now lead me to hunt for some more glorious material so I can make my next one (plus an excuse to go to Ray Stitch or place an order with Fabric Rehab!). With this success under my headscarf and my big mouth (as I have been telling friends, family and the wider Twitter community of my delights and new found talent) I have landed myself with commissions. I love this - the thought of meticulously planning my next project and getting stitching and doing it for people who want it is so exhilarating - its making me wonder why I did not start this years ago. 

My new headscarf

Until this year my sewing skills (or should I say sewing confidence) was limited and only went as far as sewing buttons on to my husbandy's shirt. Any other tasks, like when a thread was pulled, had to wait until I saw my mother-in-law who is a natural at this. It seems that the tables have now turned, now that I am armed with a Singer and a willingness to create that my new found flare is needed. My mother-in-law wants a nice wash bag (this is a great little project for me and with Mother's Day fast approaching I have the now got the perfect gift). Also my husbandy wants bespoke handkerchiefs and other little fabric-y goodies. The other added bonus to all of this is that these gifts will be handmade and made with love (and no doubt some sweat and tears along the way).  Let's hope I get a few extra pennies in my pay cheque this month to help move these ideas to fruition!

With all these great stitching projects waiting in the wings, I want to get started now but I don't know which one to start first. One thing I do know is that I shall only start on one stitching project at a time. This sound advice came from my a good friend (and sewing guru) of mine and I believe this to be sound advice, especially as I know what I am like. This is typically what happens with things that don't quite go to plan: I start a project, hit a snag, try and work it out, get frustrated, then get annoyed, throw all my toys out the pram and then give up and move onto something new - something that is less taxing. As I have mentioned in virtually all my sewing blogs that patience is vital when setting out on this journey and suddenly I've found out that I have more of this than I thought and thank goodness. 
If I was to have this old attitude with sewing I don't think I would have made anything yet with all the little glitches I have had to overcome in such a short amount of time. There is no issue in planning your projects so you can perhaps save money on bulk buying fabric, etc, but I will only physically start one project at a time and see it through to the end before starting a new one.

With the anticipation of undertaking these sewing gems I have been looking for some tutorials and I have stumbled across some great ones (all these tutorials and links will be included when I do these sewing projects). These tutorials have all ready helped me overcome my early worries, like where to buy waterproof fabric and how to resolve the issue of not having an upside down print on the wash bag! Prep, for me, is part of the excitement of my sewing journey - it adds to the experience and gets my sewing juices flowing. 

The best part of this is that I love the fact friends and family are giving me the opportunity to practice my new passion and share my new found passion and creativity with them.

Happy Stitching x

Monday, 7 January 2013

The beginnings...


Hello Ladies and Gents…


One of my inspirations for doing this is the humble headscarf. I wear headscarves a lot but finding the right one can be tricky. I wear a headscarf the vintage way.. think Hilda Ogden (minus the rollers), the traditional land-girl look. For this method you need quite a sizable scarf as you need one to cover everything. The ideal size is 80cm x 80cm. However finding a scarf with these dimensions can be a chore. It is my plan to produce quality homemade headscarves for me to wear and hopefully one of the first things I'll be making.

As my creative gusto seems to be in full swing I am going to grab the sewing bug by the needle and get cracking. So to start myself off I spent a lot of time surfing the net and reading up on the exiting world of sewing. First of all I was amazed at all the information is out there on the subject and how simple or complex it can be – the choice is yours – and there are plenty of useful places for the novices.

To get me started I wanted to purchase the basic equipment – now you may think my first purchase was a sewing machine and you would be wrong. Before I take the plunge to buy my dream machine (which I am currently researching) I thought I would buy the basic equipment you would require if you were to hand stitch. This includes scissors; thread; needles; pins; tailors chalk; tape measure; and a book for beginners and of course, some dreamy fabric. I believe this is enough equipment to get you started and I hope I am not proved too wrong early in my journey. 

To select the brands of my specific equipment again took some research. As I am setting out on this adventure I want tools that are going to last without going over the top on cost. Now you could buy these items off the internet but then you miss out of the shopping experience and the smell of the haberdashery (that I am new too but all ready loving) plus how do you know if they are too heavy, too light, good quality – a photo on a computer screen says a lot but not the same as touching and feeling the item. So I pulled out my rollers, rolled up my faux bang, put my red lippy on and with hubby in-toe went into London for my first sewing expedition.

So where to go?? During my exploration I found some great places all across London. I would have loved to visit each and everyone but then time is an issue here so I selected Ray Stitch (Nr Highbury and Islington) and MacCulloch and Wallis (just off Oxford Street) as my choices of location. By the time I had traveled from Chiswick to the store I was like a kid at Christmas – I was so over excited at the prospect of purchasing some bits and bobs. Ray Stitch is a great sewing shop – easy to find and I love the fact it mixes the genres of sewing and a cafĂ©! A cup of tea whilst pawing over gorgeous fabric and bits was heaven. I calmed down and went into the shop and suddenly realised I had forgotten my list! Luckily I had read it so often I know what I wanted and went through the shelves methodically. I purchased Coats 100% cotton thread; Pyrm needles; Prym pins; tailors chalk; tape measure; and of course, some cotton vintage flower fabric (how could I not buy the fabric!). This little lot came to £18.90 which I was pleased about as I had a £20.00 budget for this shop. I left with a big smile on my face and got on the bus to go to my next shop.


Forty minutes later I was in MacCulloch and Wallis. MacCulloch and Wallis is set over three floors of fabric and haberdashery wonderment. The stock was endless and filled with people buying all the necessities for their own projects. However I was specifically on the hunt for a decent pair of scissors as this is one of the crucial piece of equipment in your tool kit. They had a good range of scissors and in the end I went for Fiskar (Made in Finland) and for right handed 21cm scissors. They seemed a good weight, comfy for my hand and a good price point of £17.04 so went for them. Again this was a great success for me and in my £20 budget – my cheeks were hurting from smiling all day.


The only item not yet in my armory (on this particular day) was a good book for beginners. Now, again after exploring and asking fellow Twitters on this numerous responses came back. In the end I went for 'All you need to know about machine and hand sewing - Sewing Basics' by Sandra Bardwell which was £18.99. It covers all the basics from what equipment you need to threading your machine to undertaking complicated patterns to how to identify what stitch is required for what project. Perfect for me and my novice experience.


So a tip top day and very pleased with my purchases. A summary of my top tips perhaps as I have bamboozled you with info….

·        Research shops and products you need to buy
·        Try and buy the items from a shop – feel the products not just look
·        Take a list (my mistake!)
·        Budget where possible
·        Enjoy the experience… make it part of the magic