Showing posts with label circle. Show all posts

Saturday, 17 August 2013

Seeing Red? Zips, Waistbands and Hems...

Hello Ladies and Gents,

This is the second blog on making a circle skirt and they'll be a limited amount of photos... I was merrily taking pictures and when my Husbandy was looking through them when he spotted that they hadn't come out as the camera was on the wrong setting...I wasn't amused to say the least but I will try and explain the best I can and your imagination will also help!

So, I'm about to join the front and the back of the skirt together. I marked a 1.5cm seam along the side of my fabric and pinned the pieces together (right sides facing). I stitched the sides together using my Singer 2250, carefully following the line I had marked on the fabric. With one side done, I then moved onto the other which involved the invisible zip. Now I had been eager to use my invisible zipper foot for a while so now the moment had come! With my blog and Coletterie blog called "Installing an Invisible Zipper" at the ready, I was good to go!

When installing the invisible zip turn the fabric wrong side facing each other and rights sides on the outside. Mark a 1.5cm seam along the length of the zip and marking the bottom of the zip with tailors chalk. Unzip the zip and pin the zip right-side-down onto the right side of the fabric. Take the skirt to the machine and stitch making sure the zip teeth go in the left hand hole in the invisible zipper foot. Once done, do the same to the other side, pinning the right-side-down to the right side of the fabric only this time put zipper teeth into the right hole on the invisible zipper foot. Phew... invisible zip done! I must confess it took me more than one attempt to get right - especially as when doing the right hand side I puckered the fabric so had to do it again...and again. Practice does make perfect and one day I'll be the master of stitching invisible zips but until then I will do my best and not give up! To finish the seam I swapped over the pressure foot, turned the fabric inside out so right sides were facing, placed a pin at the bottom of the zip as well as pinning the two sides together and stitched. 

#selfie #nowaistband
So in theory I had a skirt and all it needed was some tarting up... how hard could it be! Now in my case I found the instructions for inserting the waistband a bit sparse so I went on to You Tube and found this great tutorial by Professor Pincushion called 'How to sew a classic waistband'. This tutorial is great for beginners and it really got me out a jam. 

With my fabric ready, I pinned the waistband to the right side of the fabric along the stay stitch which was stitched earlier. I then sewed along the edge of the waistband as close to the edge I could make it. I then took this to the iron and pressed. Once pressed you then had a nice smooth line to put in the top-stitch. With top-stitch complete, I folded over the fabric onto the wrong side of the fabric and hand sewed the waistband using a slip stitch making sure not to pierce all the way through the fabric. I then hung the skirt up over night.

Well I left it hung for a little longer than a night but it had all hung beautifully
Measuring up the hem

and I was ready to do the hem. I read the pattern and measured from the top to the bottom leaving a 1.5cm hem at the bottom. It was at this point that I could tell I had not been very accurate when cutting out the pattern so instead of measuring 1.5cm from the bottom, I measured from the top and measured at 61.5cm and joined up the marks. I then stitched using the sewing machine all along the tailors chalk mark. After stitching I took the fabric to the ironing board and pressed the fabric along the stitch I had just done. I then folded the fabric under to make a neat role and pressed and pinned - see photo below. Once pinned I did herringbone stitch all the way around to make a neat hem and ta-dah my skirt's complete.

Rolling under to make the hem
I enjoyed making this circle skirt by Simplicity but I will say a few things... 1) the pattern comes up big! When I had stitched it altogether (including the invisible zip) I had a size check and it virtually fell off! So this involved a lot of unpicking and cutting but all this made good practice for me so I saw the positive side. I followed the size 16 pattern (which says a 30" waist) and in the end made a size 12 (which says a 26" waist) so please double check before you stitch. 2) The other thing I would do differently is make the waistband double the thickness and perhaps insert some interfacing. By doing this it won't be so fiddly and make the waistband more firm and 3) The pattern is for beginners but still found the instructions a little confusing and perhaps lacking in detail. I do enjoy a challenge and working things out for myself but sometimes it can take the enjoyment away by not even having enough info to look up about! All this said, I will definitely make the skirt again and next time use a more exciting fabric!

Top Tips:

  • Equipment: Fabric (2m) with matching zip and thread, fabric scissors, paper scissors, tailors chalk, pins, sewing pattern, sewing machine, invisible zipper foot, general purpose zipper foot, tape measure, iron and time!
  • Don't be afraid to research how to do something... if you're like me you like to figure things out for yourself but when you're learning you need to take 5 and research how others have done it to help overcome those little challenges
  • Double check the measurements before taking the fabric to the sewing machine! Although I didn't mind in the long run, if you were using a more delicate fabric it could stretch or damage the fabric which would be a nightmare. Pin the fabric together and make any adjustments with safety pins

Useful Websites: 
Happy Zipping x

Monday, 12 August 2013

Seeing Red? Red Circles of Fabric that is!

Hello Ladies and Gent,


Tools for the job
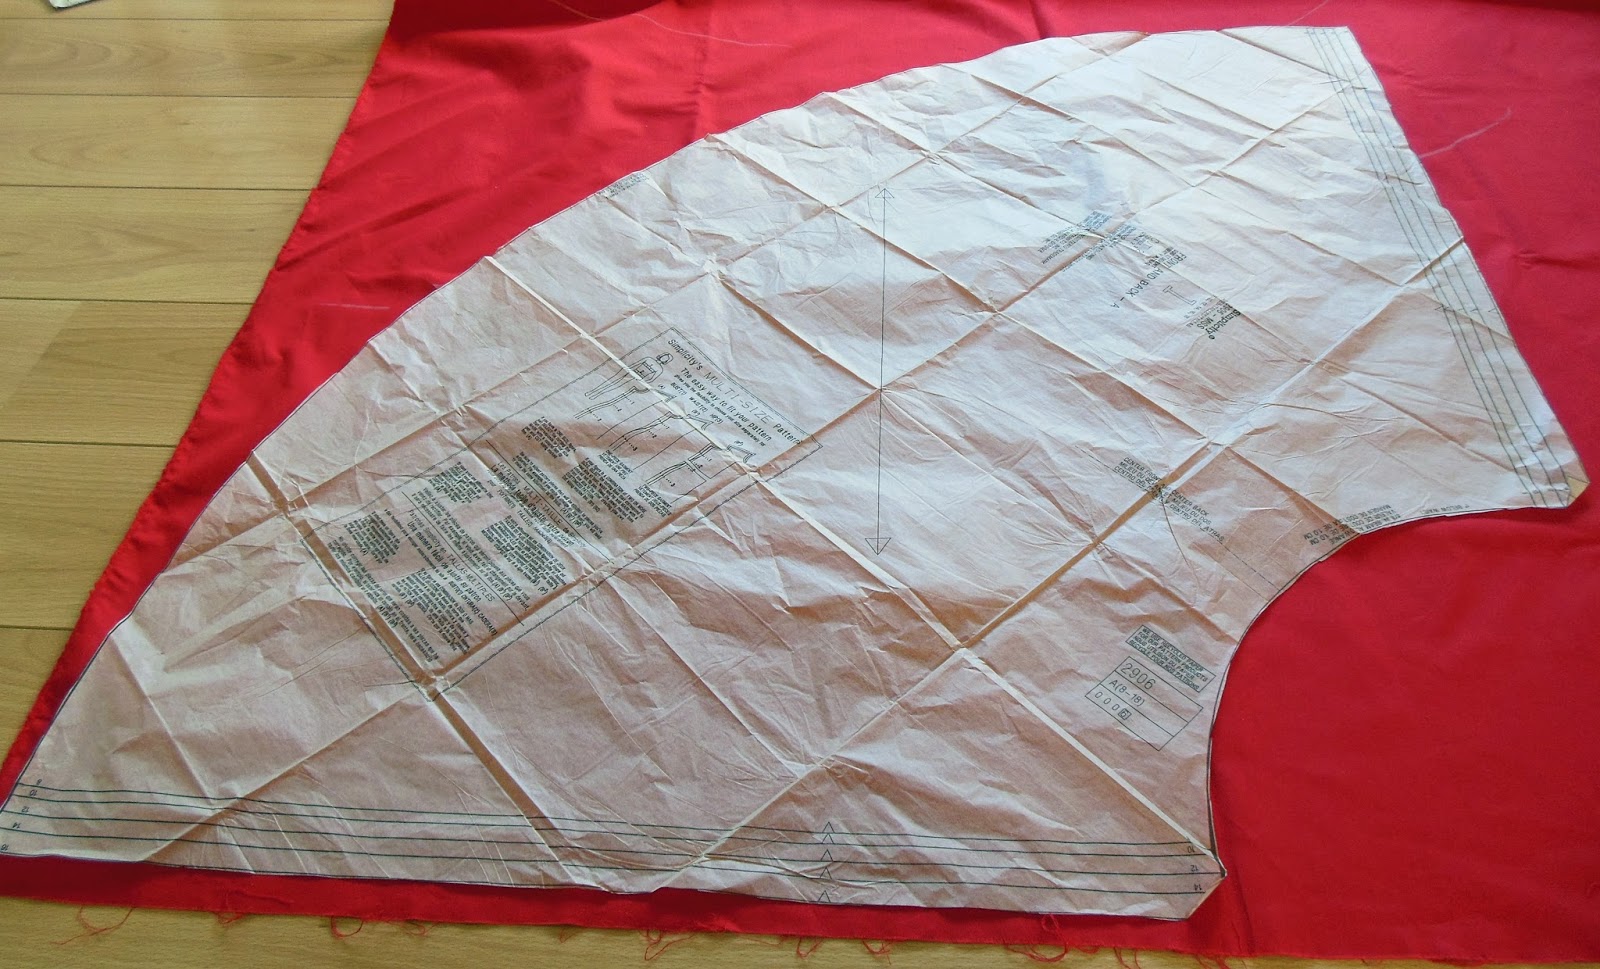
So I thought I would share with my latest sewing project... which is to attempt to make a circle skirt from a new pattern! When I went to my sewing class earlier this year, Claire-Louise aka The Thrifty Stitcher was kind enough to give me another pattern to try out at home. The pattern she gave me was the Simplicity 2906 which has two skirt patterns to follow but as I had all ready got a pattern for an 'A' line skirt I thought I ought to give the circle skirt a whirl. 

Now the dilemma of what fabric to use! I wanted to get some nice tartan fabric,
Useful hints from Sandra Bardwell
but I thought I would find matching the fabric up rather treaky so thought I better stick within my limits for now so chose a lovely crimson colour. I bought my fabric from Ray Stitch and I can't tell you how impressed I was with my visit. I called the shop the day before to see if they had the crimson fabric in stock along with a red 25cm invisible zip. I was thrilled when they said yes and told them I will see them the next day. When I arrived at 9.05am on Saturday morning they were open and had remembered my call and my goodies were all out ready for me! I was over-joyed that they had remembered and made my trip seamless (no pun intended). Now armed with my fabric (which was washed and pressed) I was ready to start creating!


Cutting lines
The first thing I did was measure myself - sadly my waist was still the same as when I made my skirt in April, but at least I've not grown in size. I took my measurement and I was a size 16 for this pattern. I cut the pattern piece out following the lines carefully and slowly. It was quite tricky as the pattern is large but I persevered  Top Tip: Gently press the pattern to ensure it is at its smoothest. I pressed the pattern when I ironed the fabric or iron it direct on a cool setting. Once cut out I then lined up the pattern on the fabric. This is when I had to remember grainlines and all that good stuff...which at first I had forgotten. I turned to my blog, Tilly and the Buttons blog as well as my good book called 'All you need to know about machine and hand sewing - Sewing Basics' by Sandra Bardwell. Although the pattern came with instructions its written in code for a novice so another Top Tip is always look up something if you are unsure of what it means. Like me I had to remind myself of the selfredge and the grain and I'm pleased I did as I originally pinned the pattern on wrong! 

I prepared my fabric (remembering to put strips of tailors chalk on the wrong
Mark the wrong side of the fabric
side of the fabric) and smoothed it by running my hand over it. Top Tip: Remember that the edge that is cut is not always 100% so don't pin the pattern against the edge. I had to look at this a few times and on the pattern you will have a long arrow which shows the grain line. In this instance the grain line was perpendicular to the selfredge. With my pattern securely pinned to the fabric, I took my fabric scissors and cut around the pattern and snipping a triangle where there were notches. The notches are there to help you line up the fabric pieces. I had to do this twice to make the front and the back piece of my skirt. Top Tip: If possible, this would be easier on a large table. I don't have this luxury but I cleared a large space on my wooden floor and cut carefully around the pattern.


Lining up the grain
Now with my fabric cut I wished I had an overlocker to stop the edges from fraying. However you can make a make-shift overlocker type thing on any sewing machine by using the zig-zag stitch. I set the machine to the longest stitch set on zig-zag and with one side sewn into the fabric and the other side just falling off the edge to catch the thread it secures the edge and helps reduce fraying. I did this to the sides and the bottom of my skirt. Tilly and the Buttons also recommends this but she does it when the hem is complete but I did it before hand - not sure if it makes a difference - time will tell.

I then double checked the instructions and realised I needed to put a 'stay stitch' in the top of the fabric to stop it from stretching. I didn't know what it was so I googled it - it is a long basting stitch that stays in - simple. So for this I set the sewing machine to a straight stitch on the longest setting and ran the stitch 1cm away from the top. Again, following the instructions I marked a 1.5cm hem down the sides with tailoring chalk in preparation for joining the pieces together and that all important invisible zip!

This is where I shall leave it today and tell you in another blog how I get on with the rest of my task! The one thing I will share is that I really enjoy the challenge this pattern is giving me! Its using the skills I have done previously plus being brave enough to try out new ones - lets hope the invisible zip comes as naturally!

Top Tips:

  • Equipment: Fabric (2m) with matching zip and thread, fabric scissors, paper scissors, tailors chalk, pins, sewing pattern, sewing machine, invisible zipper foot, general purpose zipper foot and time!
  • Gently press the pattern to ensure it is at its smoothest. I pressed the pattern when I ironed the fabric or iron it direct on a cool setting.
  • Always look up something if you are unsure of what it means. 
  • Remember that the edge that is cut is not always 100% so don't pin the pattern against the edge.
  • If possible, work on a large table. I don't have this luxury but I cleared a large space on my wooden floor and cut carefully around the pattern.

Useful Websites:


Happy Sewing xx 

Thursday, 18 July 2013

Practice Makes Perfect....

Hello Ladies and Gents and how are we all on this beautiful sun-kissed evening? I just can't get enough of it hence the lack of blogging! As I've decided to have a lazy evening I thought I would share with you what I've been up to...

Well my sewing senses have been tingling and I thought I should start a new project! I was merrily looking at the gorgeous Bernie Dexter collection on the What Katie Did website and tweeted a link about the delightful Veronique Blush Dress in the collection and how much I needed it in my every expanding collection of retro and vintage dresses. My tweeter friend 'inkfairy' saw my tweet and said that there was a great pattern of a similar design that I should give a go! I thought ok, lets have a look at this pattern. The pattern is by Sewaholic and the pattern is the Cambie Dress which is a pattern specifically designed for pear shape ladies like myself. I did some research (as always) and it said the pattern was for advanced sewers... this put me off a little (for the moment) so thought what else can I sew instead? This is when I had a brain wave (or was it a heat wave???) and decided to see what fabrics I had in my stash before I embarked on such grand ideas. I saw I had some waterproof fabric and some satin fabric along with plenty of other pieces... I thought to myself 'I know what I can do...I'll make a shower cap for my mother-in-law and a quilt for my friend who is expecting any minute!'


Sewing in the Sun!
So I assembled my tools and took my sewing basket outside and set up camp. I started preparing all the fabric for both the shower cap and the quilt and before long I had 30 squares of 4"x4", the backing of 28"x24", 2 x 20"x2", 2 x 28"x2" and two large circles all ready for the Singer! Soon I was cooking from the sun so decided to have a break and lie in the shade!


The afternoon quickly rolled passed and I ventured in to start all the 
Shower Cap!
sewing. The shower cap literally took about 30 minutes of sewing and 5 minutes to thread the elastic through! I was amazed at how simple it seemed compared to the first time. I then started to make the quilt which again only took about 60 minutes to complete. I was so impressed with myself - particularly as these two projects seemed so simple the second time round!


Quilt front and back!
What I'm trying to share with you all is that practice does make perfect. I was surprised at the ease it was to make these two items and even more that I didn't need to refer to my blog as I had logged how to make them in my brain sack. It did make the experience more pleasurable not having to check instructions every two minutes but if I start a new project I will of course follow the instructions the first time! This opened my eyes and perhaps the stunning Sewaholic Cambie Dress will have to wait a little longer. I feel I need to practice the skills I've all ready learnt before taking the next step. With this new found flare I'm now on the hunt for some tiki fabric to make another 'A' line skirt...so watch this space!

Below are a links to my previous blog plus a few other great links...

Happy Practicing x


P.S. The Bernie Dexter Dress will be in my collection soon...it's just so fabulous!! 

P.P.S. I just wanted to let you know my dear friend was over the moon with the gift of the quilt for her baby boy and here it is all ready in use. I'm so proud that I was able to share a gift that I had made with a dear friend. I hope it comes in handy and helps keep his little knees warm in winter.

Quilt being model by Baby Aidan


Sunday, 7 April 2013

Shower Cap... Circles & Thread

Hello Ladies and Gents,

Over recent months I've started to use dry shampoo and can't believe I've only discovered this wonderful product now. So with my new found love of dry hair shampoo, the need to wash my hair daily has decreased so I thought a shower cap would be a great sewing project. I did my usual world wide web search and found these great blogs by Junie Moon - One Yard Adventure: Shower Cap Tutorial and SewDelish - Some Sewing - How to Make a Shower Cap - Tutorial - links below:

http://junie-moon.blogspot.com.au/2008/08/one-yard-adventure-shower-cap-tutorial.html?m=1

http://sewdelish.blogspot.co.uk/2008/08/some-sewing-shower-cap-mini-tutorial.html?m=1

I assembled all my equipment and started to make the shower cap (see tutorials above for this information). The first challenge was how big was my head?? I got out the tape measure and measured it - it was around 22" (is that big??). After reading the tutorial to calculate how much fabric I'd need I added a buffer of two inches to this to ensure there was enough fabric to fold over and still fit my head.

Tools for the circle
Circle outline
The second challenge was how do I make a perfect circle? After thinking about what I had in the house, I got a large piece of paper, string and a pen. I folded the paper into quarters, cut the string to 12", tied the string around the pen and drew the circle. I then cut the circle out of the paper and laid this on top of the fabric and used my rotary cutter to go around the fabric. I did this for both the waterproof lining and outer fabric.

Paper circle on fabric
Cut fabric - ready to stitch


Pinned fabric
After all this prep I was eager to start sewing...so I followed the instructions and basted the material together in order to keep the fabrics from slipping. So after basting the fabric together, I went to the ironing board, ironed over about a quarter of an inch and then a further inch - when sewn this makes the pocket to thread the elastic through. As I ironed over the fabric, I pinned it down....and this is when I started to wonder if sewing a circle was such a wise choice after all...anyway I had got this far so I persevered. 

All pinned and ready I went back to the sewing machine and started to sew...this is when my patience was well and truly tested. At first I could not understand how to follow the circle - I kept having straight lines! So after a lot of unpicking and re-ironing I started again. This time, I realised I had to nip in little bits as I went round in order to make the circle. I was very pleased with myself that I had worked this out! So feeling confident, I was merrily sewing when disaster struck.... I ran out of thread - how could I run out of thread????

AAHHHHHH!!


With no thread my shower cap project came to an abrupt end -  I couldn't get over how annoyed at myself I was so top tip: always have a spare thread!

A few weeks later, armed with mountains of thread, I carried on with this project... I had mastered how to do the circle and went around the one inch hem (leaving a two inch space so the elastic could be thread around) and stitched around the outer edge. I cut the elastic to 20 inches long, put a safety pin at the end and thread it through. At this point I found it tricky, so I will explain how I overcame the challenge.

When threading the elastic, pin one end at the opening. Use a safety pin on the
Pinned ends
other end of the elastic and thread it all the way through. When back at the start pull the elastic through, safety pin the two ends together and spread the material around over the elastic (by doing this you will be able to see if you need to trim the elastic). I did need to trim the elastic and took off a further 4 inches. With the safety pin now holding both pieces together I hand stitched the ends together. Once happy the ends were secure I undid the safety pin and machine sewed over the top to ensure the elastic was secure...and ta-dah, one finished shower cap!!!


I was so pleased at what I achieved making this. It may seem simple and the tutorials are detailed and easy to follow, but for someone who is new to the sewing bug it used lots of different skills and own initiative to complete this. My next project involve zips so lets see where this takes me!

Hint and tips

  • Equipment: Paper, string, pen, iron, cutting board, rotary cutter, water-proof fabric, fabric scissors, pins, safety pins, needles, THREAD, elastic and a sewing machine
  • Check what you have in your sewing box...I double check everything now so I don't run out of thread again!
  • Research - find a tutorial that works for you
  • Patience - I do mention this every time, but it is important. I did take me a good 3-4 weeks to carry on with this project, but I'm so pleased I did as I love what I've made!
Enjoy and take your time!

Happy Stitching x

Finished shower cap!