Monday 12 August 2013

Seeing Red? Red Circles of Fabric that is!

Hello Ladies and Gent,


Tools for the job
So I thought I would share with my latest sewing project... which is to attempt to make a circle skirt from a new pattern! When I went to my sewing class earlier this year, Claire-Louise aka The Thrifty Stitcher was kind enough to give me another pattern to try out at home. The pattern she gave me was the Simplicity 2906 which has two skirt patterns to follow but as I had all ready got a pattern for an 'A' line skirt I thought I ought to give the circle skirt a whirl. 

Now the dilemma of what fabric to use! I wanted to get some nice tartan fabric,
Useful hints from Sandra Bardwell
but I thought I would find matching the fabric up rather treaky so thought I better stick within my limits for now so chose a lovely crimson colour. I bought my fabric from Ray Stitch and I can't tell you how impressed I was with my visit. I called the shop the day before to see if they had the crimson fabric in stock along with a red 25cm invisible zip. I was thrilled when they said yes and told them I will see them the next day. When I arrived at 9.05am on Saturday morning they were open and had remembered my call and my goodies were all out ready for me! I was over-joyed that they had remembered and made my trip seamless (no pun intended). Now armed with my fabric (which was washed and pressed) I was ready to start creating!


Cutting lines
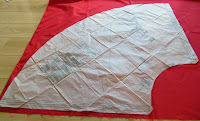
The first thing I did was measure myself - sadly my waist was still the same as when I made my skirt in April, but at least I've not grown in size. I took my measurement and I was a size 16 for this pattern. I cut the pattern piece out following the lines carefully and slowly. It was quite tricky as the pattern is large but I persevered  Top Tip: Gently press the pattern to ensure it is at its smoothest. I pressed the pattern when I ironed the fabric or iron it direct on a cool setting. Once cut out I then lined up the pattern on the fabric. This is when I had to remember grainlines and all that good stuff...which at first I had forgotten. I turned to my blog, Tilly and the Buttons blog as well as my good book called 'All you need to know about machine and hand sewing - Sewing Basics' by Sandra Bardwell. Although the pattern came with instructions its written in code for a novice so another Top Tip is always look up something if you are unsure of what it means. Like me I had to remind myself of the selfredge and the grain and I'm pleased I did as I originally pinned the pattern on wrong! 

I prepared my fabric (remembering to put strips of tailors chalk on the wrong
Mark the wrong side of the fabric
side of the fabric) and smoothed it by running my hand over it. Top Tip: Remember that the edge that is cut is not always 100% so don't pin the pattern against the edge. I had to look at this a few times and on the pattern you will have a long arrow which shows the grain line. In this instance the grain line was perpendicular to the selfredge. With my pattern securely pinned to the fabric, I took my fabric scissors and cut around the pattern and snipping a triangle where there were notches. The notches are there to help you line up the fabric pieces. I had to do this twice to make the front and the back piece of my skirt. Top Tip: If possible, this would be easier on a large table. I don't have this luxury but I cleared a large space on my wooden floor and cut carefully around the pattern.


Lining up the grain
Now with my fabric cut I wished I had an overlocker to stop the edges from fraying. However you can make a make-shift overlocker type thing on any sewing machine by using the zig-zag stitch. I set the machine to the longest stitch set on zig-zag and with one side sewn into the fabric and the other side just falling off the edge to catch the thread it secures the edge and helps reduce fraying. I did this to the sides and the bottom of my skirt. Tilly and the Buttons also recommends this but she does it when the hem is complete but I did it before hand - not sure if it makes a difference - time will tell.

I then double checked the instructions and realised I needed to put a 'stay stitch' in the top of the fabric to stop it from stretching. I didn't know what it was so I googled it - it is a long basting stitch that stays in - simple. So for this I set the sewing machine to a straight stitch on the longest setting and ran the stitch 1cm away from the top. Again, following the instructions I marked a 1.5cm hem down the sides with tailoring chalk in preparation for joining the pieces together and that all important invisible zip!

This is where I shall leave it today and tell you in another blog how I get on with the rest of my task! The one thing I will share is that I really enjoy the challenge this pattern is giving me! Its using the skills I have done previously plus being brave enough to try out new ones - lets hope the invisible zip comes as naturally!

Top Tips:

  • Equipment: Fabric (2m) with matching zip and thread, fabric scissors, paper scissors, tailors chalk, pins, sewing pattern, sewing machine, invisible zipper foot, general purpose zipper foot and time!
  • Gently press the pattern to ensure it is at its smoothest. I pressed the pattern when I ironed the fabric or iron it direct on a cool setting.
  • Always look up something if you are unsure of what it means. 
  • Remember that the edge that is cut is not always 100% so don't pin the pattern against the edge.
  • If possible, work on a large table. I don't have this luxury but I cleared a large space on my wooden floor and cut carefully around the pattern.

Useful Websites:


Happy Sewing xx 

No comments:

Post a Comment