Wednesday, 30 January 2013

Sharing the Sewing Passion


Good evening Ladies and Gentlemen,

Since making my beautiful headscarf on Saturday, I have been wearing it with pride. I wore it all day on Sunday and found it extremely comfortable - making this stitching project a further success. This has now lead me to hunt for some more glorious material so I can make my next one (plus an excuse to go to Ray Stitch or place an order with Fabric Rehab!). With this success under my headscarf and my big mouth (as I have been telling friends, family and the wider Twitter community of my delights and new found talent) I have landed myself with commissions. I love this - the thought of meticulously planning my next project and getting stitching and doing it for people who want it is so exhilarating - its making me wonder why I did not start this years ago. 

My new headscarf

Until this year my sewing skills (or should I say sewing confidence) was limited and only went as far as sewing buttons on to my husbandy's shirt. Any other tasks, like when a thread was pulled, had to wait until I saw my mother-in-law who is a natural at this. It seems that the tables have now turned, now that I am armed with a Singer and a willingness to create that my new found flare is needed. My mother-in-law wants a nice wash bag (this is a great little project for me and with Mother's Day fast approaching I have the now got the perfect gift). Also my husbandy wants bespoke handkerchiefs and other little fabric-y goodies. The other added bonus to all of this is that these gifts will be handmade and made with love (and no doubt some sweat and tears along the way).  Let's hope I get a few extra pennies in my pay cheque this month to help move these ideas to fruition!

With all these great stitching projects waiting in the wings, I want to get started now but I don't know which one to start first. One thing I do know is that I shall only start on one stitching project at a time. This sound advice came from my a good friend (and sewing guru) of mine and I believe this to be sound advice, especially as I know what I am like. This is typically what happens with things that don't quite go to plan: I start a project, hit a snag, try and work it out, get frustrated, then get annoyed, throw all my toys out the pram and then give up and move onto something new - something that is less taxing. As I have mentioned in virtually all my sewing blogs that patience is vital when setting out on this journey and suddenly I've found out that I have more of this than I thought and thank goodness. 
If I was to have this old attitude with sewing I don't think I would have made anything yet with all the little glitches I have had to overcome in such a short amount of time. There is no issue in planning your projects so you can perhaps save money on bulk buying fabric, etc, but I will only physically start one project at a time and see it through to the end before starting a new one.

With the anticipation of undertaking these sewing gems I have been looking for some tutorials and I have stumbled across some great ones (all these tutorials and links will be included when I do these sewing projects). These tutorials have all ready helped me overcome my early worries, like where to buy waterproof fabric and how to resolve the issue of not having an upside down print on the wash bag! Prep, for me, is part of the excitement of my sewing journey - it adds to the experience and gets my sewing juices flowing. 

The best part of this is that I love the fact friends and family are giving me the opportunity to practice my new passion and share my new found passion and creativity with them.

Happy Stitching x

Saturday, 26 January 2013

Mitered Corners and Headscarf Success!


Good Evening Ladies and Gentlemen,

Today I thought I would attempt to make my perfect headscarf. As I have mentioned in one of my previous blogs, the main reason I want to make headscarves is because I find it difficult to find the perfect  dimension to fit my head comfortably and have enough material left over to do a bow or something on top. This is also a simple project for a novice to begin with so I got stitching.

So in order to make the headscarf I looked at how to do hemming and more importantly, mitered corners. These little corners make square and rectangular fabric so neat and tidy that I just had to learn how to do them. I went on to You Tube and found this great tutorial by TreadleLady - link below:

http://www.youtube.com/watch?v=rdOSLpZ37kU

...plus another great site was recommended to me by my Twitter sewing friends - see link below:

http://www.craftstylish.com/item/13024/how-to-make-cocktail-and-dinner-napkins/page/all

Both tutorials are great and looked easy to follow so I began on my stitching quest. BTY - I'm not going to give a blow by blow account as you can get this from the super tutorials above. I'm going to describe how I got on as a beginner and what additional pearls of wisdom I can share to all you new fellow stitching novices.

First attempt - the willie warmer
I thought I ought to practice first as although it looked simple from the tutorials, I had a sneaky suspicion that these little corners were more tricky than they seemed. I used some left over material from my tote back and ironed the edge to about an inch (sorry if I jump from inches to cm - I like to mix a bit of old and new together !). I then brought this back to the sewing machine and followed the tutorial. Well, my first attempt was a shambles! It ended up looking like a willy warmer gone wrong and the corners were so uneven that I could only sew the hem three out of the four sides!


So attempt two - I measured the fabric and cut it using my new Pyrm rotary cutter. With even corners and ironing back about a half an inch of fabric I took to the sewing machine again. This attempt was better although the corners were still not great and the hem was rather wonky.

My new motto has definitely got to be 'if at first you don't succeed; try, try again' as I gave these tricksy corners a final go. I measured and trimmed the fabric. I ironed about a third of an inch all the way round and tried out these corners again - and bingo - I was impressed. Third time lucky! Tip: although bigger is normally easier to practice on, I didn't find this.  With this third attempt being a triumph I thought I would give my headscarf a whirl.


Measuring up
Cutting up
This time I made sure all the measurements were completely accurate. I cut an 82cmx82cm piece of fabric using my Fissler scissors, Pyrm rotary cutter, metal ruler, tape measure and craft mat.  This was the first time I had cut fabric to size before and my tip on this is to buy a quilting ruler. I have not bought one yet but I think this help to achieve straight lines and be able to put enough pressure on the fabric to stop it from moving. Anyway, after much measuring, cutting and slicing I was ready to prepare my scarf for stitching. I ironed a hem a third of inch wide and constantly measure as I ironed to ensure that the hem was consistent all the way around. This may sound anal but by doing this you are more likely to get a straight hem and great mitered corners. After pressing I went and did my corners. I followed the tutorial to guarantee I did not make any slip ups. Tip: Do try to make sure the corners are the same length as this is crucial for final hemming.  I pinned the hem as there was almost a metre of material and would aid the sewing of the hem. I took the fabric back the machine and sewed my hem and ta-dah- one completed headscarf! This made me very happy and although it took about 3 hours to get the technique of the mitered corners right (plus bobbin winding, re-threading of the machine and other little dilemmas) I now have a headscarf that I made and will wear with pride!

Hint and tips
Pinned headscarf ready to stitch
  • Equipment: Iron, craft mat, metal ruler, rotary cutter or fabric scissors, tape measure, fabric, pins, thread and a sewing machine
  • Patience - oh my, I mention this every time but as I'm setting out on this adventure I can't stress it enough!
  • Check the bobbin for thread - luckily mine ran out on attempt three so was not a major disaster, but I had forgotten so please check  - especially when stitching large amounts of fabric
  • Make sure you measure the hem - this is will help when making the mitered corners
  • Measure the fabric correctly - I thought I had and instead of being an 80cmx80cm, it is actually 78cmx78cm so not quite perfect! I think I should have cut the fabric at 83cm or 84cm but I will know for next time
Enjoy and take your time!

Happy Stitching x


Sunday, 20 January 2013

My New Toys


Good Evening Ladies and Gentlemen on this wintery evening...

All week I had been looking forward to the weekend (as always) as I had been planning to go into Central London to buy some bits to assist in my next sewing project. With the snow falling, the temperature dipping and no tube all weekend (engineering works) I thought my plans may have been scuppered, but with high hopes I put my rollers in on Friday night hoping the UK annual day of snow would pass. I was heavily disappointed when I woke up Saturday morning to find there was snow everywhere and it was even colder! I started to throw a strop as I don't like to buy my sewing bits over the internet as I enjoy the whole experience and the bleak weather was really a turn off. BUT before my mood wound out of control I decided that the only answer was to wrap up, shut up and drive into town... and I'm so glad I did. With the weather being so bleak the roads were dead and parking was easy to find and free. I dashed to the Northern line and by 2pm I was in town, lurking about.

After a few detours (via Author where I picked up some great shoes in the sale) I ended up at MacCulloch and Wallis. I do love this shop. I love the fact it is spread over three floors - each floor hiding that perfect gem to aid with your sewing magic. I headed straight to the haberdashery section and found the items on my shopping list - some Gutterman yellow thread (made in Greece) and a Pyrm 60cm Rotary Cutter (made in Japan). The reason I bought the rotary cutter is because when I made my tote bag I noticed that some of edges were not particularly straight and thought this would be added by the rotary cutter. On taking my items to the counter a woman (who was purchasing a great deal of sewing delights) advised me to buy a spare blade as you don't want a blunt blade when starting on a new project. What a great idea I thought and luckily they had them in stock so I snuck this through the till as well. A great little spend - now I just wanted to go home and use it!

Before going home, I popped over the other side Oxford Street and ventured into John Lewis as although I love to support the independents (and try too), I like to look there for ideas and bench marking of stuff. Well, it made me even more delighted when the Prym 60cm Rotary Cutter was £10 less in MacCulloch and Wallis than John Lewis - I was shocked! £10 is a lot of money and can buy you a lot of crafty bits. John Lewis - shame on you! I also looked at the quilting rulers as I think this will aid in achieving straight lines, but refrained from buying as I would used the metal ruler I all ready have.

That was it...my trip in the snow and cold had been worthwhile. I wanted to use my rotary cutter straight away but I had to think where my craft mat was and bum, it was in the garage - the weather had to have the last attack! Anyway, the Sunday came with yet more snow but I had to get in the garage and find my craft mat (I have had the mat for years as I used to make cards and new it would come in handy some day!). I found my craft mat and unleashed the blade. Now be warned it achieved the results I wanted - some nice clean lines - but the blade is extremely sharp - but I was so happy that I have now the tools to ensure my next project will be a success! 

So all tools ready, fabric has arrived and now I need to practice my mitered corners before I make my first head scarf... roll on next weekend!!

Happy Sewing x


My temporary sewing box

Thursday, 17 January 2013

The Perfect Cuppa


Hello Ladies and Gents.... 

Now, whilst I am waiting for my more fabric for my next project I thought I would write a blog on a subject that I am somewhat an expert in..... tea bags! I love tea and over the years I have tried hundreds of different brands in pursuit of the perfect cup-a-tea. If you want to know more and want some pointers on the perfect tea bag, please read on.

The range of teas over the last ten years has expanded beyond belief and on offer range from the weird and wacky flavours to the more traditional English Breakfast Tea. Tea for me (as in black tea, e.g. ceylon, assam, kenya, etc) is important to me as I probably drink more tea than any other form of liquid. On my quest to find the perfect tea bag I have dropped a few clangers but I feel now, after a long time searching, I have found the best tea bags. I supposed I should let you know how I take my tea. I love my tea weak to medium, quite milky and with one sugar. Caramel in colour is the best tea for me. Some people love their tea strong enough to put hairs on your chest; so thick and syrupy that you can stand your spoon in it! Some like it black with no sugar! Not me, I am very particular and in my opinion tea should be made with milk and one sugar.

Of course because I have milk in my tea this form any important part of the perfect cup. Obviously I have semi-skimmed and rarely full fat. My favourite milk is the Organic Duchy milk from Waitrose.. it's absolutely divine and sometimes I drink it straight. If I'm feeling a little saucy I sometimes go for Sainsbury's full fat Taste the Difference Jersey milk.

Obviously the other key ingredient is water. As I live in London I tend not to use tap water if I can help it, in fact when I'm at home I never use tap water (even though I boil it). I use bottled water, normally Evian or Volvic. My favourite water is Isklar but I haven't seen it on the shelves for a while.

One more thing must be added here before I talk brands is the mug or cup you drink from also makes a good cuppa. I prefer a mug to a cup that is not too large with a thick rim. Bone china thin is not good for me. I like a good size rim so when you take the first few sips you don't burn your lip. I have a couple of favourite mugs - and here they are: 


Everyone has their own brewing process. I put the bag in the cup, pour the water, add the milk (to gauge perfect colour) and stir for a little while before crushing the bag against the side of the mug. Then bag out and sugar in! Normally my brewing takes about 35 seconds then optimum colour is achieved. 

OK so now onto the tea bags! Hurrah I hear you cry!! I have tried many brands from the more generic Tetley and PG tips through to Duchy Organics Breakfast and loose Ceylon leaves from Orange Pekoe (a truly delightful tea shop in West London).

Now I do not want to come across as a tea snob but I am not a big fan of Tetley or PG tips or other standard teas. To me they taste powdery and strong in flavour and if you don't mind I'm going to rule these brands out straight away.

Ceylon loose tea leaves from Orange Pekoe
Remember this is my interpretation of the perfect tea bag. This tea is definitely worth a mention though because they're so nice. They offer lovely fresh flavour, good colour and all in all a very decent cuppa. The downside for me is that they are loose. I enjoy the experience of making it and drinking it but I do not enjoy cleaning the pot and faffing around. Although this is indeed a very tasty tea and one that I stock in my cupboard I can't mark it as it doesn't come in bag form.

My top four bags:

Duchy Organic Breakfast Tea
They make a good colour and taste good too although you are not guaranteed the same taste every time. Also the price tag is not that bad either at £1.79 for 40.
Colour: nice standard tea colour, a bit on the light side but remember I like my tea weak: 7/10
Taste: decent taste but not always consistent so one cup can vary from another: 6/10
Total score: 6.5/10

Tea Pigs Breakfast Tea
I totally love the packaging and the shape of these little bags. I also like they have a dunking string which makes them perfect for the mug. The tea itself is also good, making a light colour and having a smooth taste. The only snag I would say is the price is that they are £4 for 15 bags but that's a bit irrelevant as I'm not scoring on price.
Colour: lovely rich colour with these bags: 7/10
Taste: smooth tasty with no dry aftertaste 7/10
Total score: 7/10

Twinings
Now there are two from Twinings I'm going to tell you about - Breakfast and Afternoon. Now logic states you should have Breakfast in the morning and Afternoon, well, in the afternoon. That doesn't quite work out for me as I find the Breakfast bags too strong. I think it is so strong it gives the appearance of a weak cup of coffee. It's Afternoon version is a different story! It makes an excellent cup of tea with a near perfect colour and taste. 100 bags is £4.29.
Colour: 8/10
Taste: 8:10
Total score: 8/10

Betty's Tea Room Tea
My in-laws introduced me to this tea bag. The packaging is decorative which lures you to the box instantly. Life Twinings (above) you have the option of loose or bags. I have tried both but this review is based on the bag version. This tea consistently makes a wonderful light colour and always has the same amazing taste despite however long you let the bag brew. Betty's tea bags cost £3.95 for 80 which puts them in the higher price bracket especially as you have to get these mail order (unless you live near a Betty's tearoom).
Colour: 10/10
Taste: 10/10
Total score: 10/10


So there you have a breakdown of my top four tea bags! I urge any tea lover to have at least one of the above in their cupboard and I especially recommend you make an order for some Betty's tea.


Now I bet you're dying for a cuppa - that goes for me too! So I'll leaf you with that for now while I attend to my whistling kettle.


Monday, 14 January 2013

My First Project - the Tote Bag


Good Evening Ladies and Gents,

With the sewing machine fully threaded and my test stitches a success, I wanted to have a go on my first project. My bundle of fabric had arrived from Fabric Rehab (they are totally gorgeous) and I had decided to make a tote bag. I choose a tote bag for the simple reason that my husbandy and my rollers do not get on very well, especially when he stands on one at 3am with bare feet, so I thought a cute little tote bag to keep them all together would be a great idea! I trawled through 'You Tube' looking for a tutorial that was clear and concise and was not too simple, yet not too hard. I found this one called 'How to Sew an Easy/Simple Shoulder Tote Bag (Tutorial) - It's a Cinch!' by tlcinspirations - link below:

http://www.youtube.com/watch?v=_a9Yt1gmutQ&feature=youtu.be

I got my pins, scissors, tape measures, chalk, ruler and fabric ready and measured my fabric. I marked my fabric to the following dimensions:

  • Outer fabric - 10inch x 18inch
  • Lining - 9.5inch x 18inch
  • Ties - 2inch x 18inch


I marked it clearly and cut along the fabric. Tip: I would recommend not to cut the fabric on the floor. I found my lines were not as straight as they could have been but I have definitely selected the right pair of scissors as they glided through the fabric. With my slightly skew-whiff fabric I had all my pieces ready so I set the sewing machine roaring! I was in my element watching the needle glide seamlessly through the fabric leaving a trail of neat stitches behind - oh the satisfaction!

Now I'm not going to give you a full blown account on the steps as you can watch the tutorial for yourself. To personalise the bag I did alter a few things, e.g. I made the bag quite a lot smaller, had straight ties instead of angular ends and no runners up the side plus had lots of fun as I went along as I think the lady giving the tutorial (although very clear and concise) doesn't sound like she is enjoying it! I had quite a few bobbin issues, tensions issues, unpicking issues and the pressure foot falling off twice (tip: always have the manual handy) but I persevered and it took me approx. three hours in total to make my bag. I was impressed considering I hadn't sewn since 1996 and had no one to assist when things kept going wrong. In some ways I actually enjoyed the fluff ups as I think I understand the machine better and know I have more patience than I thought.


I now am the proud owner of a tote bag that has given my rollers a home - I 'm sure the odd one or two will make a run for it but hopefully my husbandy's bare feet won't find them!


The excitement this one project has given me is inspiring. It is making me think about myself in a whole new way and no doubt I will learn a great deal more about me - and maybe even sewing! I think the key thing is that even though I ran in to difficulties I persevered and managed to solve the problem calmly and logically. This may seem normal to some of you reading this, but when things go wrong - and normally with an electrical appliance - my logic goes out the window and a hammer is the usual course of action. Maybe because I really want this project to work I want to understand the basics and learn how to do it right rather than rush through it and think 'that'll do'. Who knows, but what I do know is this - there will be plenty more sewing projects and I think I all ready know what....


Hints and tips
  • Again be patient - I had to unpick the same work twice but I knew I had to have it right and also it made very good practice
  • Also have the manual and a good sewing book to hand
  • Bobbins - Firstly the check you have enough thread in the bobbin - I ran out and was not impressed and secondly make sure you wind the bobbin up correctly - ensure you snap the thread into the bobbin threader as this will guarantee you get the right tension on the thread in
  • Always have an unpicker at hand - it saved the day and also a lot of time
  • Cut the fabric on a table or on a firm surface - this will help when cutting and keep the lines straight
  • Next on the shopping list is a wooden metre rule and a fabric cutter - this will also help keep the lines straight!

Sunday, 13 January 2013

My First Stitches


Hi Ladies and Gentlemen…

The essentials
With the anticipation of threading the machine all most making me burst with excitement I thought it was time to unleash the sewing machine. I prepared my working area by placing the table near the window for good light (although by the time I got around to sewing it was dark!), cleared all the clutter in the vicinity, made sure I had a power point and got all my sewing tool kit ready to go just in-case. This kit now includes a wonderful pin-cushion (Made in Britain) purchased from 'Random Button'. I got my Singer and whipped it out the box in all its glory - I was still so pleased with my choice of sewing machine. After reading the manual (again) and making a cup of tea I was good to start with threading the bobbin.

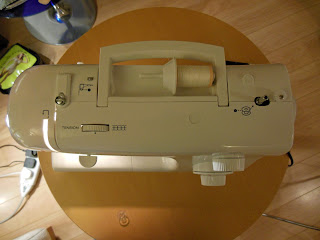
View from the top of Singer 2250
I took my Coats 100% cotton thread and inserted into the spool holder. Once inserted I took the thread and snapped it into the thread guide, around the bobbin thread guide and through the hole into the bobbin (making sure you go from the underneath). I then popped it on to the bobbin winder and slid it across to the right and pressed on the peddle. To watch the bobbin go round and round was very exciting. After a little while I stopped peddling and took the bobbin and ta-dah, it was done. (NB: On my first attempt it went wrong as I had not realised the thread had got caught on the handle of my machine. I had to unwind the bobbin and start again so top tip – check the thread carefully before pressing the peddle!). I inserted the bobbin into the bobbin case ensuring the cotton was through the top of the bobbin case with the thread falling to the right and inserted it into the machine. 

After my success I went onto to thread the machine. Firstly I made sure the needle was at the highest point by turning the handwheel and raising the pressure foot.  Again I took the cotton, passed it through the thread guide and the pre-tension spring, pass the thread down and up the channel, hook the thread behind the thin wire needle clamp guide and through the needle from front to back. I found locating the thin wire needle clamp guide a bit tricky and to begin with I thought it may have broken off but after a thorough examination it was there so all was well in my World!

Threaded machine!
‘What a success!’ I thought to myself and now to hook the two together by raising the bobbin thread. I put the presser foot up and turned the handwheel towards me lowering and raising the needle. The first time the needle went down it did not work, but a few more turns it was hooked and I gently pulled the bobbin thread up and pulled through the back of the machine! I now desperately wanted to get sewing but I had no scrap material so this is where the husbandy comes in handy. I took an old t-shirt and cut it up and started to stitch. It worked like a dream and started to practice a few stitches - it was so satisfying.

I am now waiting for my bundle to arrive from Fabric Rehab so I can get practicing and start on my project… hurry up Mr Postman!

Hints and tips
  • Patience! When I came to thread it again had a total nightmare but I persevered and it all came good in the end
  • Check the thread is not caught on any other part of the machine before winding the bobbin or starting on a project
  • Have a pair of scissors on hand - always useful
  • Do use the manual - it is like a Bible!
  • Don't wear red lipstick when threading - I licked the end and it went pink! 

Thursday, 10 January 2013

The Sewing Machine


Hi Ladies and Gentlemen…

To date I have bought my essential bits for my sewing tool kit and now my attention turns to the main item – the sewing machine. Sewing machines were first patented in the 1790s and Mr Singer commercialised the sewing machine in the 1850s giving everyone the opportunity to sew and stitch at home and now there are many different brands covering a wide range of functions and prices. This was my first hurdle as I did not appreciate there was such a variety - all targeted at different skill level and functionality – I thought it was one size fits all. In some ways I was pleased so I did not have to get an all singing all dancing machine that would leave me in a mess and not continue 
with my goal.

A good friend of mine, who is a stitching wizz, said as long as it has 10 or so stitches and can do some button holes it will be a good beginning machine. With this sound advice (and advice from my sewing book and the Thrifty Stitcher website) I looked extensively over the World Wide Web at Singer, Berina, Brother, Janome and other brands. I started to get overwhelmed at the possibility and found a few I thought would fit the stitch. But then I thought - how large are they and what do they actually feel like? So with list in hand I went to John Lewis on Oxford Street. Here they offer a great range of sewing machines (including their own brand) and I was able to touch and caress the machines there. I like square machines over rounded (this principle also applies to cars – especially old Fords – but I digress) and I liked the fact that the ones I viewed were not that heavy and also not too expensive. With this in mind I was a bit blinkered to the task at hand and not focusing on the functionality. Then the sewing machine which I had researched was there and in my grasp and it was the……

Singer 2250

It was like love at first glance – I knew this would suit my capabilities to the ground (which are basic in sewing), matched my price tag (always a good thing to keep the husbandy happy), did not weigh a tonne (so I did not incur an injury getting it home), small enough to fit in the space allocated at home (although now I have made my favourite shoes homeless).

When I got the Singer 2250 home I took it out of the box and made sure all the items were there (which they were plus an extra bobbin) and read the manual…. I wanted to thread it and get cracking but it was getting late, I had no scrap material to test on and other general life things needed to be done – boo.

So now I am all set to go… sewing tool box and sewing machine. I just need to cut up on old bed sheet and start practicing…. Oh I can’t wait!!


Monday, 7 January 2013

The beginnings...


Hello Ladies and Gents…


One of my inspirations for doing this is the humble headscarf. I wear headscarves a lot but finding the right one can be tricky. I wear a headscarf the vintage way.. think Hilda Ogden (minus the rollers), the traditional land-girl look. For this method you need quite a sizable scarf as you need one to cover everything. The ideal size is 80cm x 80cm. However finding a scarf with these dimensions can be a chore. It is my plan to produce quality homemade headscarves for me to wear and hopefully one of the first things I'll be making.

As my creative gusto seems to be in full swing I am going to grab the sewing bug by the needle and get cracking. So to start myself off I spent a lot of time surfing the net and reading up on the exiting world of sewing. First of all I was amazed at all the information is out there on the subject and how simple or complex it can be – the choice is yours – and there are plenty of useful places for the novices.

To get me started I wanted to purchase the basic equipment – now you may think my first purchase was a sewing machine and you would be wrong. Before I take the plunge to buy my dream machine (which I am currently researching) I thought I would buy the basic equipment you would require if you were to hand stitch. This includes scissors; thread; needles; pins; tailors chalk; tape measure; and a book for beginners and of course, some dreamy fabric. I believe this is enough equipment to get you started and I hope I am not proved too wrong early in my journey. 

To select the brands of my specific equipment again took some research. As I am setting out on this adventure I want tools that are going to last without going over the top on cost. Now you could buy these items off the internet but then you miss out of the shopping experience and the smell of the haberdashery (that I am new too but all ready loving) plus how do you know if they are too heavy, too light, good quality – a photo on a computer screen says a lot but not the same as touching and feeling the item. So I pulled out my rollers, rolled up my faux bang, put my red lippy on and with hubby in-toe went into London for my first sewing expedition.

So where to go?? During my exploration I found some great places all across London. I would have loved to visit each and everyone but then time is an issue here so I selected Ray Stitch (Nr Highbury and Islington) and MacCulloch and Wallis (just off Oxford Street) as my choices of location. By the time I had traveled from Chiswick to the store I was like a kid at Christmas – I was so over excited at the prospect of purchasing some bits and bobs. Ray Stitch is a great sewing shop – easy to find and I love the fact it mixes the genres of sewing and a cafĂ©! A cup of tea whilst pawing over gorgeous fabric and bits was heaven. I calmed down and went into the shop and suddenly realised I had forgotten my list! Luckily I had read it so often I know what I wanted and went through the shelves methodically. I purchased Coats 100% cotton thread; Pyrm needles; Prym pins; tailors chalk; tape measure; and of course, some cotton vintage flower fabric (how could I not buy the fabric!). This little lot came to £18.90 which I was pleased about as I had a £20.00 budget for this shop. I left with a big smile on my face and got on the bus to go to my next shop.


Forty minutes later I was in MacCulloch and Wallis. MacCulloch and Wallis is set over three floors of fabric and haberdashery wonderment. The stock was endless and filled with people buying all the necessities for their own projects. However I was specifically on the hunt for a decent pair of scissors as this is one of the crucial piece of equipment in your tool kit. They had a good range of scissors and in the end I went for Fiskar (Made in Finland) and for right handed 21cm scissors. They seemed a good weight, comfy for my hand and a good price point of £17.04 so went for them. Again this was a great success for me and in my £20 budget – my cheeks were hurting from smiling all day.


The only item not yet in my armory (on this particular day) was a good book for beginners. Now, again after exploring and asking fellow Twitters on this numerous responses came back. In the end I went for 'All you need to know about machine and hand sewing - Sewing Basics' by Sandra Bardwell which was £18.99. It covers all the basics from what equipment you need to threading your machine to undertaking complicated patterns to how to identify what stitch is required for what project. Perfect for me and my novice experience.


So a tip top day and very pleased with my purchases. A summary of my top tips perhaps as I have bamboozled you with info….

·        Research shops and products you need to buy
·        Try and buy the items from a shop – feel the products not just look
·        Take a list (my mistake!)
·        Budget where possible
·        Enjoy the experience… make it part of the magic

Sunday, 6 January 2013

Blogging is a stitch...

Hello ladies and gentlemen.. my name is Amy and I'm a devoted follower of alternative fashion. Welcome to my first blog, I'll tell you a little about me, what I like to get up to and my plans for the future.

First of all... blogging is a stitch! It's taken me about 308 minutes to get an understanding of this website and how to set up a profile. I'm sure I'll be picking things up along the way but I would really appreciate any hints and tips, so feel free to give me pointers...


Me.. well I've being following alternative fashion for a few years and like many I love to dress up and make a teeny-weeny bit of loads of effort in creating the appropriate look for the occasion. The good news is that the scene is becoming increasingly popular and quality gear is becoming more and more available (for not insane prices). Shops/designers like Vivien of Holloway, Dolly Dare and Miss Fortune are producing some really stunning pieces for all occasions, whether it be hitting the tiles, shopping in Soho or walking the guinea pig. It's also good to mix things up.. new or old it doesn't really matter as long as it looks like you haven't tried too hard and you feel confident enough to hit the streets and bars. The right look will have you feeling a million bucks; whenever I'm feeling a lil' blue, I put my hair in rollers, slap on the red lips and.. well.. kick some ass!


Something I have always wanted to get involved in is making stuff. As a child I was always quite creative but over the years my hands-on creativity has dwindled.. I guess life has just got in the way! I've decided to take charge of my limited free time and use some of it to stitch.