Hi Ladies and Gentlemen…
 |
| The essentials |
With the anticipation of threading the machine all most
making me burst with excitement I thought it was time to unleash the sewing
machine. I prepared my working area by placing the table near the window for
good light (although by the time I got around to sewing it was dark!), cleared
all the clutter in the vicinity, made sure I had a power point and got all my
sewing tool kit ready to go just in-case. This kit now
includes a wonderful pin-cushion (Made in Britain) purchased from 'Random Button'. I got my Singer and whipped it
out the box in all its glory - I was still so pleased with my choice of
sewing machine. After reading the manual (again) and making a cup of tea I was good to start with
threading the bobbin.
 |
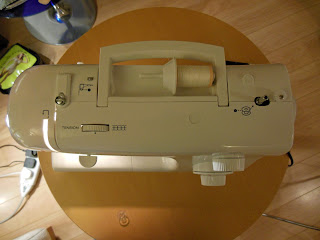
| View from the top of Singer 2250 |
I took my Coats 100% cotton thread and inserted into the
spool holder. Once inserted I took the thread and snapped it into the thread guide, around the bobbin thread
guide and through the hole into the bobbin (making sure you go from the
underneath). I then popped it on to the bobbin winder and slid it across to the
right and pressed on the peddle. To watch the bobbin go round and round was very
exciting. After a little while I stopped peddling and took the bobbin and ta-dah, it was done. (NB: On my first attempt it went wrong as I had not realised the thread had got caught on the handle of my machine. I had to unwind the bobbin and start again so top tip – check the thread carefully before pressing the peddle!). I inserted the bobbin into the bobbin case ensuring the
cotton was through the top of the bobbin case with the thread falling to the right and inserted it into the
machine.
After my success I went onto to thread the machine. Firstly
I made sure the needle was at the highest point by turning the handwheel and
raising the pressure foot. Again I took
the cotton, passed it through the thread guide and the pre-tension spring, pass
the thread down and up the channel, hook
the thread behind the thin wire needle clamp guide and through the needle from
front to back. I found locating the thin wire needle clamp guide a bit tricky
and to begin with I thought it may have broken off but after a thorough
examination it was there so all was well in my World!
 |
| Threaded machine! |
‘What a success!’ I thought to myself and now to hook the
two together by raising the bobbin thread. I put the presser foot up and turned
the handwheel towards me lowering and raising the needle. The first time the
needle went down it did not work, but a few more turns it was hooked and I
gently pulled the bobbin thread up and pulled through the back of the machine! I now desperately wanted to get sewing but I had no scrap
material so this is where the husbandy comes in handy. I took an old t-shirt
and cut it up and started to stitch. It worked like a dream and started to
practice a few stitches - it was so satisfying.
I am now waiting for my bundle to arrive from Fabric Rehab
so I can get practicing and start on my project… hurry up Mr Postman!
Hints and tips
- Patience! When I came to thread it again had a total nightmare but I persevered and it all came good in the end
- Check the thread is not caught on any other part of the machine before winding the bobbin or starting on a project
- Have a pair of scissors on hand - always useful
- Do use the manual - it is like a Bible!
- Don't wear red lipstick when threading - I licked the end and it went pink!
No comments:
Post a Comment